Note : This website is my personal repositary hence it is having all the collection of documents which i gathered and prepared by own.
OAF Basic Part 1
Index
- What is OA Framework
- Why OA Framework
- OAF Vs FORMS
- OA Framework Architecture
- MVC Architecture and its Components
- Profile Options
- JDeveloper Structure
- Naming Standards
What is OA Framework?
Oracle Application Framework(OA Framework) is a proprietary framework developed by Oracle Corporation for application development within the Oracle E-Business Suite.
Available to customers for personalization, customizations and custom-application development.
The OA Framework is a Model-view-controller (MVC) framework built using J2EE (Java 2 Platform, Enterprise Edition)technologies.
Why OA Framework?
Advantages :
- Enterprise-Grade Performance and Scalability
- Improved End User Productivity
- Highly extensible architecture
- Browser Look and Feel (BLAF terminology) for all applications
- Open industry Standards such as XML, HTML, Java, JSP,
- SQL and Web Services.
| Using Oracle Forms | OA Framework |
|---|---|
| With Oracle Forms I can create custom Apps modules and modify seeded Apps Forms. | JDeveloper is the development tool for creating custom Apps web pages and modifying seeded Apps web pages. |
| I use SQL and PL/SQL in Oracle Forms | We will still use SQL statements, specifically in View Objects. We can execute PL/SQL, but within Java code. If your Java skills are nil or weak, now might be a good time to plan a training program. See What To Do Next for more information. |
| An Oracle Forms file (.fmb) contains screen design and custom procedures and functions. | Reusable code, that is the mantra for JDeveloper and OA Framework. In Oracle Forms a data block references a table or view, and that definition is contained within the .fmb. With JDeveloper, we create view objects or entity objects that can be reused by other web pages. |
| In Forms, I can reuse forms, libraries, and menus by referencing. | OA Framework is an assembly of reusable objects. |
| I use TEMPLATE.fmb as the starting point for any custom Apps forms. TEMPLATE.fmb contains references to libraries, property settings, and menus that will help make custom forms look-and-feel like Oracle-provided forms. | OA Framework is a development and deployment platform presented through JDeveloper. The seeded objects and settings give custom web pages the same look-and-feel as Oracle-provided web pages |
|
In Forms I create and use canvases: Forms requires a root canvas I use stacked canvases for controlling access to groups of items Fields and buttons appear on a canvas Properties control the appearance of canvases and items |
In OA Framework we use the concept of a region: *A web page requires a root region *Regions can be nested *Widgets (fields, buttons, images, etc) appear in a region * Properties control the appearance of widgets |
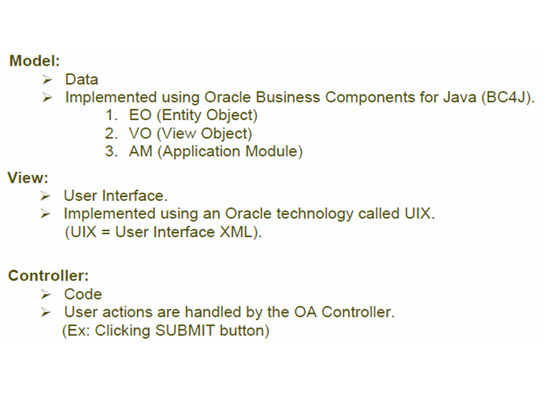
Entity Object (EO)
Entity Object is based on database table or other data source.
Entity Object contains attributes which represent database columns.
All insert/update/delete (DML Operations) transactions go through EO to database.
View Object (VO)
Two types
- 1. SQL based
- 2. EO based
Application Module (AM)
Every page must have a root application module.
Handles transactions.
Application Modules serve as containers for related BC4J Objects.
The objects are related by participating in the same task (for example, a multi-page UI for creating purchase orders)
Application Modules provide transaction context
Application Modules establish database connections
Application Modules may be nested to provide more complex application modules
Controller (CO) in MVC Architecture
Responds to user actions and directs application flow.
Model objects like EO and VO can't be accessed directly from the Controller Class, except AM.
Contains methods such as
- 1. ProcessRequest: Fires when OAF page loads for the first time.
- 2. ProcessFormRequest: Fires when user submits the page. (Ex: clicking GO button)
MVC Architecture
Model-View-Controller (MVC) Design Pattern
Profile Options
To Enable the “about this page” link on the page set the below profile option as “yes”
FND: Diagnostics : Yes
To Enable the “personalize page” link on the page set the below profile options as “yes”
Personalize Self-Service Defn : Yes
FND: Personalization Region Link Enabled : Yes
Jdeveloper Structure
Naming Standards
Page Name Ends with PG/PAGE
Region name ends with RN
Entity Object Name ends with EO
View Object ends with VO
Application Module Name Ends with AM
Controller Name ends with CO
For a complete detail of the OAF BASIC1, If you liked this reading then you can download a PDF version of this wonderful guide : OAF BASIC1 in PDF
OAF Basic Part 2
Index
- What is OA Framework
- Why OA Framework
- OAF Vs FORMS
- OA Framework Architecture
- MVC Architecture and its Components
- Profile Options
- JDeveloper Structure
- Naming Standards
What is OA Framework?
Oracle Application Framework(OA Framework) is a proprietary framework developed by Oracle Corporation for application development within the Oracle E-Business Suite.
Available to customers for personalization, customizations and custom-application development.
The OA Framework is a Model-view-controller (MVC) framework built using J2EE (Java 2 Platform, Enterprise Edition)technologies.
Why OA Framework?
Advantages :
- Enterprise-Grade Performance and Scalability
- Improved End User Productivity
- Highly extensible architecture
- Browser Look and Feel (BLAF terminology) for all applications
- Open industry Standards such as XML, HTML, Java, JSP,
- SQL and Web Services.
| Using Oracle Forms | OA Framework |
|---|---|
| With Oracle Forms I can create custom Apps modules and modify seeded Apps Forms. | JDeveloper is the development tool for creating custom Apps web pages and modifying seeded Apps web pages. |
| I use SQL and PL/SQL in Oracle Forms | We will still use SQL statements, specifically in View Objects. We can execute PL/SQL, but within Java code. If your Java skills are nil or weak, now might be a good time to plan a training program. See What To Do Next for more information. |
| An Oracle Forms file (.fmb) contains screen design and custom procedures and functions. | Reusable code, that is the mantra for JDeveloper and OA Framework. In Oracle Forms a data block references a table or view, and that definition is contained within the .fmb. With JDeveloper, we create view objects or entity objects that can be reused by other web pages. |
| In Forms, I can reuse forms, libraries, and menus by referencing. | OA Framework is an assembly of reusable objects. |
| I use TEMPLATE.fmb as the starting point for any custom Apps forms. TEMPLATE.fmb contains references to libraries, property settings, and menus that will help make custom forms look-and-feel like Oracle-provided forms. | OA Framework is a development and deployment platform presented through JDeveloper. The seeded objects and settings give custom web pages the same look-and-feel as Oracle-provided web pages |
|
In Forms I create and use canvases: Forms requires a root canvas I use stacked canvases for controlling access to groups of items Fields and buttons appear on a canvas Properties control the appearance of canvases and items |
In OA Framework we use the concept of a region: *A web page requires a root region *Regions can be nested *Widgets (fields, buttons, images, etc) appear in a region * Properties control the appearance of widgets |

Entity Object (EO)
Entity Object is based on database table or other data source.
Entity Object contains attributes which represent database columns.
All insert/update/delete (DML Operations) transactions go through EO to database.
View Object (VO)
Two types
- 1. SQL based
- 2. EO based
Application Module (AM)
Every page must have a root application module.
Handles transactions.
Application Modules serve as containers for related BC4J Objects.
The objects are related by participating in the same task (for example, a multi-page UI for creating purchase orders)
Application Modules provide transaction context
Application Modules establish database connections
Application Modules may be nested to provide more complex application modules
Controller (CO) in MVC Architecture
Responds to user actions and directs application flow.
Model objects like EO and VO can't be accessed directly from the Controller Class, except AM.
Contains methods such as
- 1. ProcessRequest: Fires when OAF page loads for the first time.
- 2. ProcessFormRequest: Fires when user submits the page. (Ex: clicking GO button)
MVC Architecture
Model-View-Controller (MVC) Design Pattern
Profile Options
To Enable the “about this page” link on the page set the below profile option as “yes”
FND: Diagnostics : Yes
To Enable the “personalize page” link on the page set the below profile options as “yes”
Personalize Self-Service Defn : Yes
FND: Personalization Region Link Enabled : Yes
Jdeveloper Structure
Naming Standards
Page Name Ends with PG/PAGE
Region name ends with RN
Entity Object Name ends with EO
View Object ends with VO
Application Module Name Ends with AM
Controller Name ends with CO
For a complete detail of the OAF BASIC1, If you liked this reading then you can download a PDF version of this wonderful guide : OAF BASIC1 in PDF
Content
How to find the Jdeveloper Version
How to find the correct dbc file
How to find the Application Short Name and Responsibility Key
How to find the Jdeveloper Version
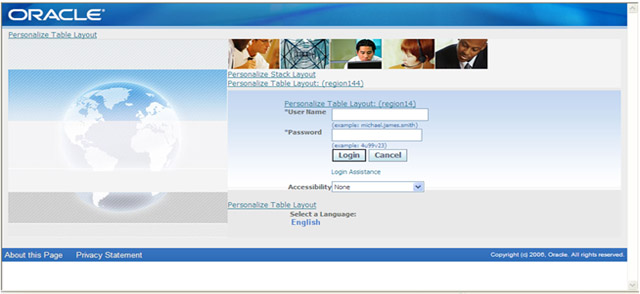 Login to the application
Set the FND: Diagnostics Profile Option as “YES” to see About this Page link
Click on the “About this Page”
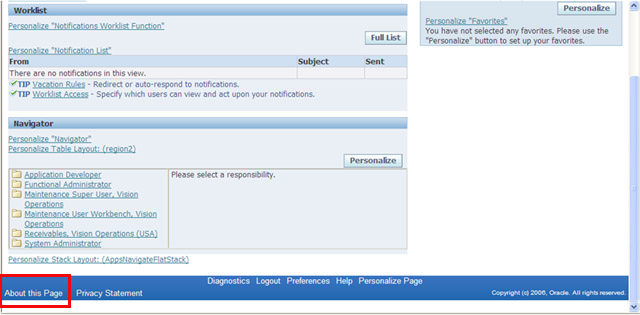
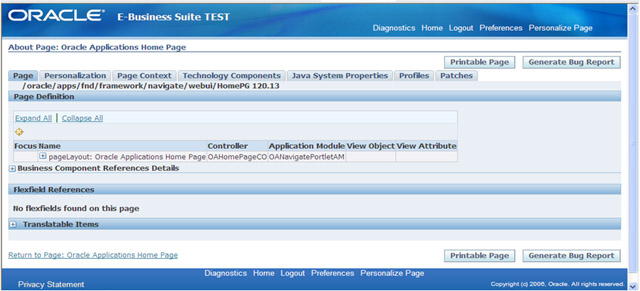 Click on Technology Components
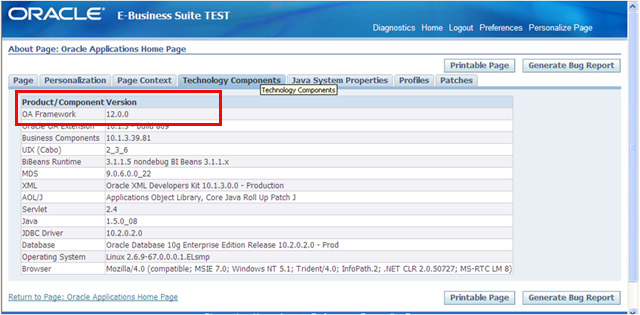 Takedown the version of the OA Framework and check the JDEVELOPER version for the same OAF Version in the Doc Id: 416708.1
Download the JDEVELOPER Patch from the My Oracle Support
Extract this into local system
How to find the correct dbc file
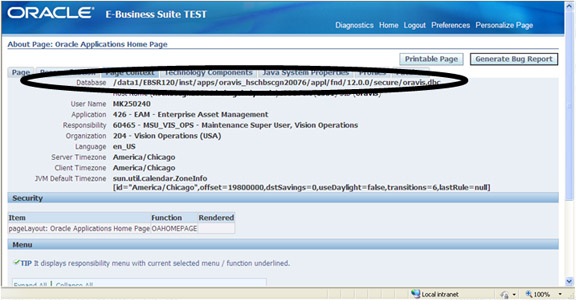 Click on Page Context.
Copy the path of the Database from the above screen.
Ask the DBA’s for the same dbc file.
xPlace this dbc file into ………/Jdevhome/jdev/dbc_files/secure
How to find the Application Short Name and Responsibility Key
There are 2 ways to find the Application short name and Responsibility Key
1. Getting from back end(DB)
2. Getting from the Application
To get the App Short Name and Resp Key from DB we need the Application Login Credentials which we are going to use while creating the OAProject thru JDeveloper
Getting from back end(DB): Use the below Query
SELECT FRESP.RESPONSIBILITY_KEY,FRESP.APPLICATION_ID,FAPP.APPLICATION_SHORT_NAME
FROM FND_RESPONSIBILITY FRESP,FND_APPLICATION FAPP WHERE RESPONSIBILITY_ID in(select RESPONSIBILITY_ID FROM FND_USER_RESP_GROUPS_DIRECT WHERE user_id=(select user_id FROM fnd_user WHERE user_name='MK250240')) AND FAPP.APPLICATION_ID in(select RESPONSIBILITY_APPLICATION_ID from FND_USER_RESP_GROUPS_DIRECT where user_id=(select user_id from fnd_user where user_name='MK250240'))
AND FRESP.APPLICATION_ID =FAPP.APPLICATION_ID
Note : MK250240 is Application Login User Name
Getting from the Application
Application Short Name :
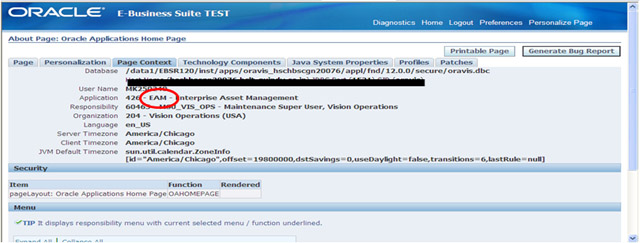 Application Short Name : EAM (From the above screen)
Responsibility Key :
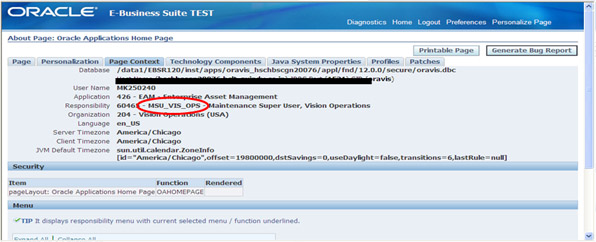 Responsibility Key : MSU_VIS_OPS (From the above screen)
For a complete detail of the OAF BASIC2, If you liked this reading then you can download a PDF version of this wonderful guide : OAF BASIC2 in PDF
Application Module Extension in OAF
Like the Controller extension, AM extension is also not supported by Oracle. However for some business needs we have to extend it sometimes.
Root AM Can’t be extended where as we can extend Nested AM’s only.
This AM can be found under below BC4J package
mahi.oracle.apps.fnd.Employee.server.CreateEmployeeAM
Why we are extending AM:-
This CreateEmployeeAM contains an apply method which subsequently commits the transaction.
Self Service Purpose
public void apply()
{
getTransaction().commit();
}
Our business need is to capture user name and user id at runtime and insert it into a custom audit table for audit purpose
Here is Audit Table script --
CREATE TABLE test_tab1
( -- -------------------
-- Data Columns
-- --------------------
user_id VARCHAR(50),
user_name VARCHAR(50),
-- -------------------
-- Who Columns
-- -------------------
last_update_date DATE NOT NULL,
last_updated_by NUMBER NOT NULL,
creation_date DATE NOT NULL,
created_by NUMBER NOT NULL,
last_update_login NUMBER
);
Steps to Extend Application Module (AM)
1. Create a New Application Module (AM)
Right Click on Employee(is nothinh but your .jpr name in jdeveloper) > New > ADF Business Components > Application Module
Package -- mahi.oracle.apps.fnd.Employee.server
Name -- ExtnCreateEmployeeAM
Extends -- mahi.oracle.apps.fnd.Employee.server.CreateEmployeeAM
Click Next à NextàNext
Select the Generate Java File(s) Check Box
Click Finish.
Write following code in ExtnCreateEmployeeAMImpl.java
import oracle.apps.fnd.framework.OAException;
import java.sql.PreparedStatement;
import java.sql.Connection;
public class ExtnCreateEmployeeAMImpl extends CreateEmployeeAMImpl
{
....
public void apply()
{
java.sql.Date d = getOADBTransaction().getCurrentDBDate().dateValue();
try
{
Connection conn = getOADBTransaction().getJdbcConnection();
String Query = "insert into test_tab1 values(:1,:2,:3,:4,:5,:6,:7)";
PreparedStatement stmt = conn.prepareStatement(Query);
stmt.setInt(1, getOADBTransaction().getUserId());
stmt.setString(2, getOADBTransaction().getUserName());
stmt.setDate(3, d);
stmt.setInt(4, getOADBTransaction().getUserId());
stmt.setDate(5, d);
stmt.setInt(6, getOADBTransaction().getUserId());
stmt.setInt(7, getOADBTransaction().getUserId());
stmt.execute();
}
catch(Exception exception)
{
throw new OAException("Error in Staffing Query"+exception, OAException.ERROR);
}
super.apply();
}
}
2. Perform AM Substitution
Double Click on Employee.jpx
Business Components ->Substitutions
Left Side : Base AM. i.e. CreateEmployeeAM
Right Side : Custom AM. i.e. ExtnCreateEmployeeAM
Click on Add
3. After substitution it will modify *.jpx
In our case it will modify Employee.jpx at project location i.e. -- D:\xxxx\jdevhome\jdev\myclasses
4. Migrate/ Import the modified jpx
Open Command Prompt and go to following location of your project D:\xxxx\jdevbin\oaext\bin
Use this Import Command to import jpx
Jpximport.bat D:\xxxx\jdevhome\jdev\myclasses\Employee.jpx -username apps -password guptag123 -dbconnection "(DESCRIPTION=(LOAD_BALANCE=YES)(FAILOVER=YES)(ADDRESS_LIST=(ADDRESS=(PROTOCOL=tcp)
(HOST=test.mahi.com) (PORT=1586)))(CONNECT_DATA=(SID= DEV2)))"
Once you Run the above command you will get a path for your Extension(Copy this path. It will be used to
delete this extension if any error occurs)
5. Congratulation you have successfully finished. Run Your CreateEmployeePG page and Test Your Work
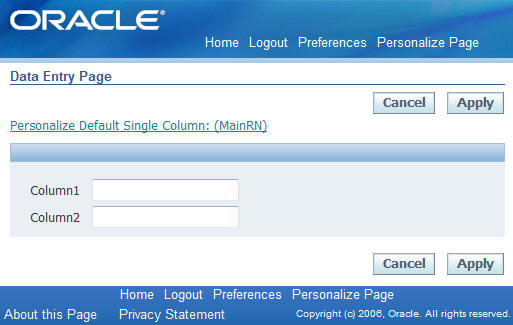
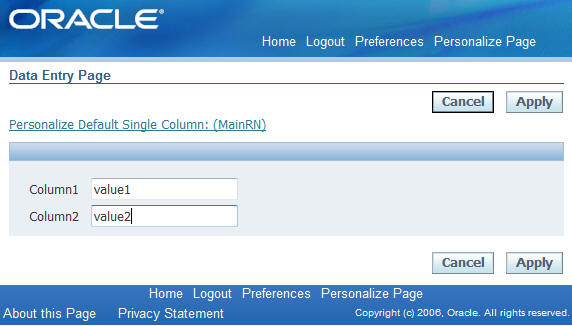
Controller Extension in OAF
Set the values of following profiles to enable Personalization Page link in OAF Pages
| Profile Name | Value |
|---|---|
| FND: Personalization Region Link Enabled | Yes |
| Personalize Self-Service Defn | Yes |
| Disable Self-Service Personal | No |
Oracle does not recommend that customers extend controller objects associated with regions or webbeans in shipped E-Business Suite product pages.
Controller class (oracle.apps.fnd.framework.webui.OAControllerImpl) methods should effectively be considered private, since their implementation is subject to change. Controller extensions are therefore not considered to be durable between upgrades.
If it is absolutely essential to handle custom form submit events on a shipped product page, processFormRequest() is the only method that should be overriden in a controller class, although the risks outlined above still apply.
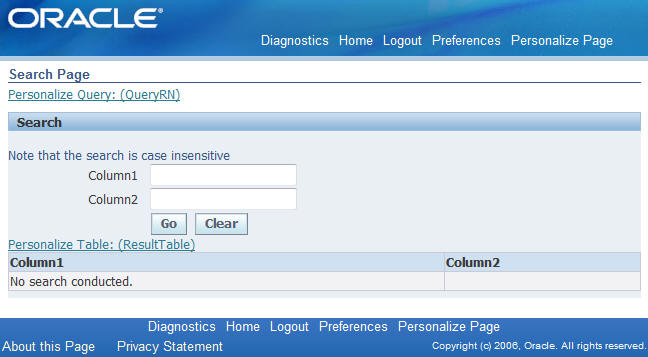
Now we will extend this newly created CO under this exercise.
The purpose of this exercise is to modify the VO query of results table.
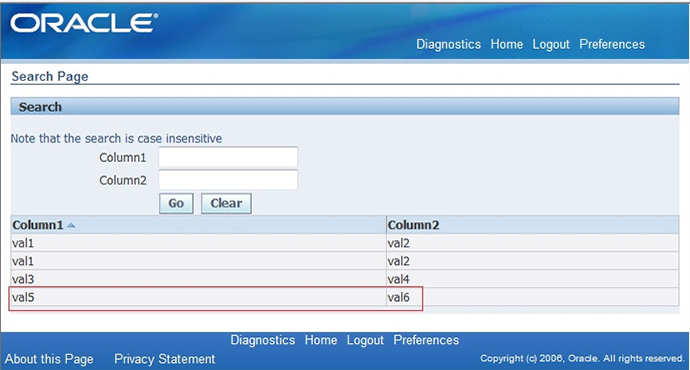
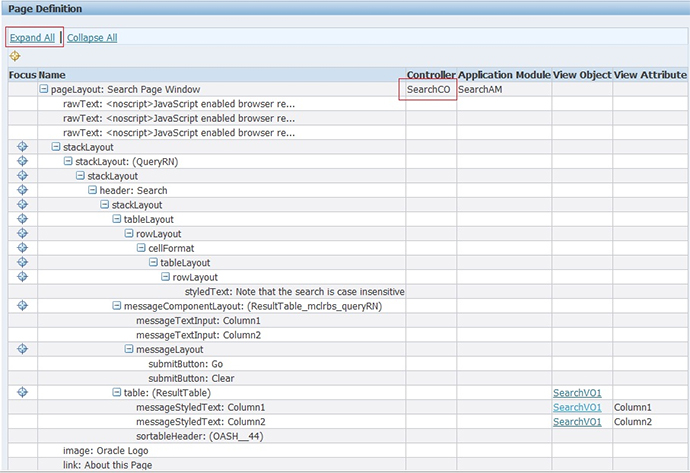
Now when we click on Go button all the records are displaying in the results table and our OBJECTIVE is to bind the VO query of results table in such a way that in result Column1 valueval5 and Column2 value val6 should not come as result on click Go button
File > New > General > Workspace Configured for Oracle Applications
File Name – MahiCOExtensionDemo
Automatically a new OA Project will also be created
Project Name -- COExtensionDemo
Default Package -- Mahi.oracle.apps.fnd.coextensiondemo.webui
2. Create a New Java Class
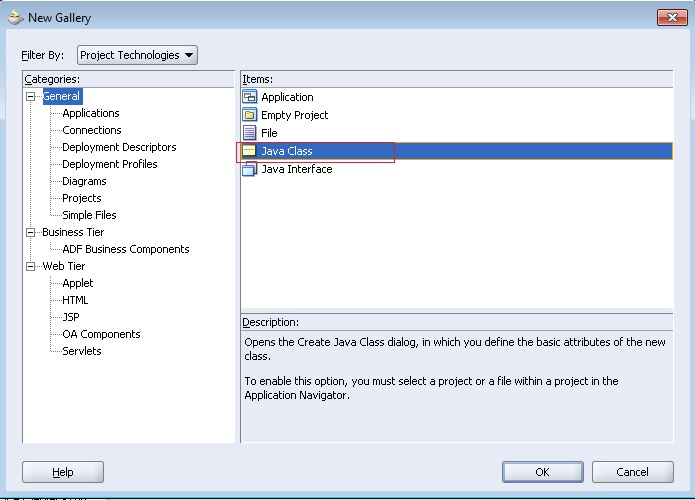
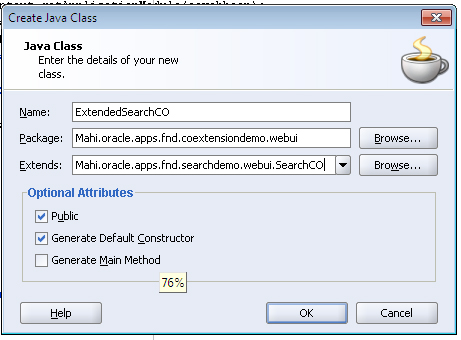
Right Click on COExtensionDemo > New > General > Java Class
Name -- ExtendedSearchCO
Package -- Mahi.oracle.apps.fnd.coextensiondemo.webui
Extends -- Mahi.oracle.apps.fnd.searchdemo.webui.SearchCO
3. Write below logic in ExtendedSearchCO Java Class
package Mahi.oracle.apps.fnd.coextensiondemo.webui;
import Mahi.oracle.apps.fnd.searchdemo.webui.SearchCO;
import oracle.apps.fnd.framework.webui.OAPageContext;
import oracle.apps.fnd.framework.webui.beans.OAWebBean;
import oracle.apps.fnd.framework.OAApplicationModule;
import oracle.apps.fnd.framework.webui.beans.layout.OAQueryBean;
import Mahi.oracle.apps.fnd.searchdemo.server.SearchVOImpl;
public class ExtendedSearchCO extends SearchCO
{
public ExtendedSearchCO ()
{
}
public void processFormRequest(OAPageContext pageContext, OAWebBean webBean)
{
super.processFormRequest(pageContext, webBean);
OAApplicationModule am = pageContext.getApplicationModule(webBean);
OAQueryBean queryBean = (OAQueryBean)webBean.findChildRecursive("QueryRN");
//Capturing Go Button ID
String go = queryBean.getGoButtonName();
//If its Not NULL which mean user has pressed "Go" Button
if(pageContext.getParameter(go)!=null)
{
// Setting whereClause at Runtime to restrict the query
SearchVOImpl vo = (SearchVOImpl)am.findViewObject("SearchVO1");
vo.setWhereClause(null);
vo.setWhereClause("Column1 <>:1 AND Column2 <>:2");
vo.setWhereClauseParam(0,"val5");
vo.setWhereClauseParam(1,"val6");
}
}
}
4. Attach new controller to SearchPG through personalization
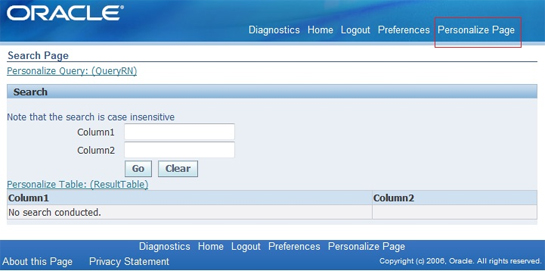
Click on Personalize Page link on top right hand side of your page
Click on Complete View -> Expand All -> Click on personalize icon next to Page Layout
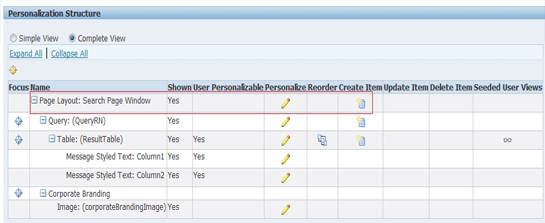
Now at site level give the path of extended controller as we are extending the controller at SITE LEVEL
Mahi.oracle.apps.fnd.coextensiondemo.webui.ExtendedSearchCO
By defaylt it will come as Inherit
Click Apply -> Return to Application
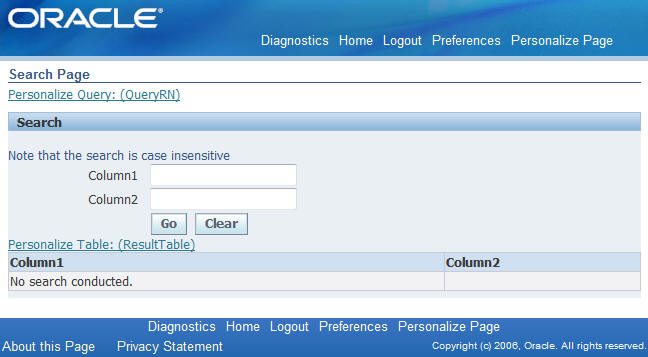
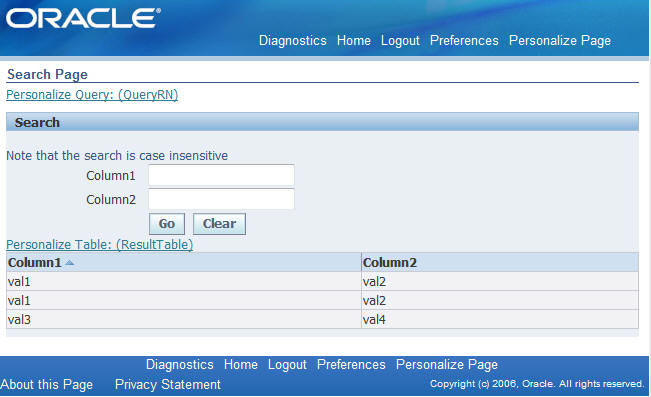
Note – Record with Column1 value val5 and Column2 value val6 is not coming in result
Creating VO at RunTime in Controller OR Dynamically created VO
ViewObject DVO = oapagecontext.getApplicationModule(oawebbean).findViewObject("DynamicVO ");
OAApplicationModule oaapplicationmodule = oapagecontext.getApplicationModule(oawebbean);
if(DVO == null)
{
String Query = "SELECT project_id FROM PA_PROJECTS_ALL WHERE segment1 =:1";
DVO = oaapplicationmodule.createViewObjectFromQueryStmt("DynamicVO", Query);
}
DVO.setWhereClauseParam(0, s1);
DVO.executeQuery();
int i = DVO.getRowCount();
if(i != 1)
{
Debug.log(oapagecontext, this, "Error : Project Number is Invalid or not unique", 3);
OAException oaexception4 = null;
oaexception4 = new OAException("PA", "PA_PROJECT_NUMBER_INVALID");
oaexception4.setApplicationModule(oaapplicationmodule);
throw oaexception4;
}
oracle.jbo.Row row = DVO.last();
if(row != null)
{
Object obj2 = row.getAttribute(0);
if(obj2 != null)
{
String s2 = obj2.toString();
if(s2 != null)
{
oapagecontext.putTransactionValue("paProjectId", s2); // Capturing projectid in Session
if(oaapplicationmodule.findViewObject("AddNewAssignmentsVO") != null)
{
oaapplicationmodule.findViewObject("AddNewAssignmentVO").first().setAttribute("ProjectId", s2);
}
}
}
}
How to Capture LOV Event In OAF
if (pageContext.isLovEvent())
{
System.out.println("Inside LOV Event");
String lovInputSourceId = pageContext.getLovInputSourceId();
//checking which lov event is fired.
//Below EmployeeLovInput is the ID of messageLovInput
if ("EmployeeLovInput".equals(lovInputSourceId))
{
//Invokes AM Method
am.invokeMethod("setExtraInfo");
}
}
How to get value from a Form Value bean in Controller
It's very easy to get value from a formValue bean, but until you know it, it seems to be difficult.
So let’s try to understand how to get value from a formValue bean. Before going furthere I assume that you have a page PsrPG and a controller PsrCO and also a formValue in the page PayGroupCode and the formValue bean has some value that you want to capture in a variable in your PsrExtCO controller.
Let’s take this in steps for easy understanding and rememberance.
Step 1: To get the value of form value in a controller, please create a handle of the formvalue bean as given below.
OAFormValueBean PayGroupCodeFormValue = (OAFormValueBean)oawebbean.findChildRecursive("PayGroupCode");
Step 2: Create a String type variable and fetch the value using the handle created by calling a method named getValue(pageContext) –
String PayGroupCodeFormValue = (String)PayGroupCodeFormValueBean.getValue(oapagecontext);
Implement Train in OAF Page
Let us try to implement train between three pages. Consider three pages each having Text Item
1. Create a New OA Workspace and Empty OA Project
File> New > General> Workspace Configured for Oracle Applications
File Name -- TrainProj
Project Name – TrainDemoProj
Default Package -- mahi.oracle.apps.fnd.traindemo
2. Create Application Module AM
TrainDemoProj right click > New > ADF Business Components > Application Module
Name -- TrainDemoAM
Package -- mahi.oracle.apps.fnd.traindemo.server Check Generate JavaFile(s)
Create Three Pages TrainDemoPG1, TrainDemoPG2 and TrainDemoPG3 as similar way as mention below to create TrainDemoPG1
3. Create a OA components Pages
TrainDemoProj right click > New > OA Components > Page
Name – TrainDemoPG1
Package -- mahi.oracle.apps.fnd.traindemo.webui
4. Modify the Page Layout (Top-level) Region
| Attribute | Property |
|---|---|
| ID | PageLayoutRN |
| Region Style | pageLayout |
| Form Property | True |
| Auto Footer | True |
| Window Title | Train Demo Window Title |
| Title | Train Demo Page Header |
| AM Definition | mahi.oracle.apps.fnd.traindemo.server.TrainDemoAM |
5. Create the Second Region (Main Content Region)
Select PageLayoutRN right click > New > Region
| Attribute | Property |
|---|---|
| ID | MainRN |
| Region Style | messageComponentLayout |
Create Text Items for all three pages say TextItemPage1, TextItemPage2 and TextItemPage3 in respective pages TrainDemoPG1, TrainDemoPG2 and TrainDemoPG3 in similar way of as mention below to create TextItemPage1 in page TrainDemoPG1
6. Create Text Items
Select MainRN right click > New > messageTextInput
Prompt – TextItemPage1
Length -- 20
7. Create a Standalone Train Region
TrainDemoProj > New > Web Tier > OA Components > Region
Name -- TrainRN
Package – mahi.oracle.apps.fnd.traindemo.webuiStyle – train
Select TrainRN inStructure pane and open property inspector and set Allow Interaction property to True
8. Add Three Train Nodes to TrainRN
Right Click on TrainRN in Structure pane > New > Link
Set the link properties as follow --
ID – TrainStep1
Item Style – link
Text – Step 1
Destination URI – OA.jsp?page=/mahi/oracle/apps/fnd/traindemo/webui/TrainDemoPG1
Right Click on TrainRN in Structure pane > New > Link
Set the link properties as follow --
ID – TrainStep2
Item Style – link
Text – Step 2
Destination URI – OA.jsp?page=/mahi/oracle/apps/fnd/traindemo/webui/TrainDemoPG2
Right Click on TrainRN in Structure pane > New > Link
Set the link properties as follow --
ID – TrainStep3
Item Style – link
Text – Step 3
Destination URI – OA.jsp?page=/mahi/oracle/apps/fnd/traindemo/webui/TrainDemoPG3
9. Add Train Region to each of your Pages
For each of three pages in multistep flow, right click the pageLayoutRN in structure panel, and select New > location from page Context menu
Set following properties as follow --
ID – TrainDemoRN
Extends -- /mahi/oracle/apps/fnd/traindemo/webui/TrainRN
10. Create a Standalone (Shared) TrainFooterRN
TrainDemoProj > New > Web Tier > OA Components > Region
Name -- TrainFooterRN
Package -- mahi.oracle.apps.fnd.traindemo.webui
Region Style -- pageButtonBar
11. Add navigrationBar
Select TrainFooterRN in Structure pane right click > New > Region
Set the region properties as follows:
ID -- NavBar
Region Style – navigationBar
First Step – 1
Last Step – 3
12. Add Links to the navigrationBar
Right Click on NavBar > New > link
Set Item’s properties as follows:
ID – Step1Link
Item Style – link
Text – Step 1 of 3: Page1
Warn About Changes – False
Destination URI -- /mahi/oracle/apps/fnd/traindemo/webui/TrainDemoPG1
Right Click on NavBar > New > link
Set Item’s properties as follows:
ID – Step2Link
Item Style – link
Text – Step 2 of 3: Page2
Warn About Changes – False
Destination URI -- /mahi/oracle/apps/fnd/traindemo/webui/TrainDemoPG2
Right Click on NavBar > New > link
Set Item’s properties as follows:
ID – Step3Link
Item Style – link
Text – Step 3 of 3: Page3
Warn About Changes – False
Destination URI -- /mahi/oracle/apps/fnd/traindemo/webui/TrainDemoPG3
13. Initialize the Footer Region
Select TrainFooterRN in Structure pane right click > Set New Controller
Class Name -- TrainDemoCO
Package Name – mahi.oracle.apps.fnd.traindemo.webui
Add following code in processRequest()
import oracle.apps.fnd.framework.webui.beans.nav.OATrainBean;
import oracle.apps.fnd.framework.webui.beans.nav.OANavigationBarBean;
...
public void processRequest(OAPageContext pageContext, OAWebBean webBean)
{
super.processRequest(pageContext, webBean);
OATrainBean trainBean =
(OATrainBean)pageContext.getPageLayoutBean().getLocation();
trainBean.prepareForRendering(pageContext);
int step = trainBean.getSelectedTrainStepRenderedIndex();
OANavigationBarBean navBean =
(OANavigationBarBean)webBean.findChildRecursive("NavBar");
navBean.setValue(step+1);
} // end processRequest()
14. Add the Navigation Region to your pages
For each of three pages in the multistep flow, right click the PageLayoutRN in Structure pane and select New > Region
Set the region’s properties as follow:
ID -- PageButtonBar
Style -- pageButtonBar
Extends -- /mahi/oracle/apps/fnd/traindemo/webui/TrainFooterRN
15. Congratulation you have successfully finished. Run Your TrainDemoPG1 page and Test Your Work
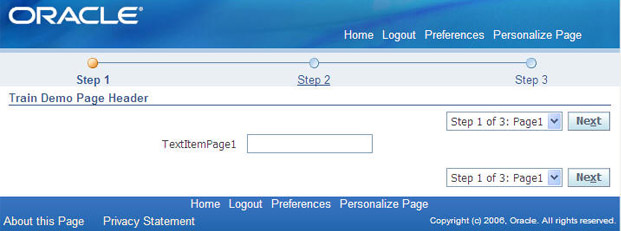
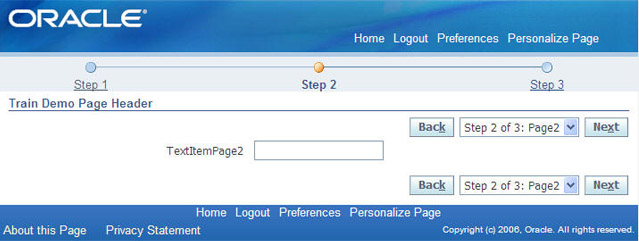
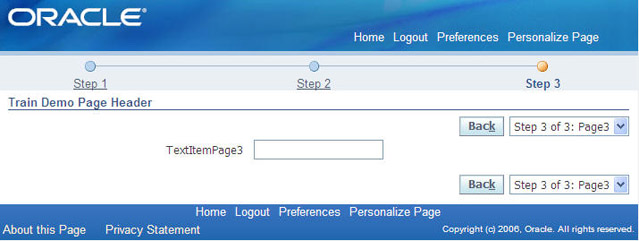
How to migrate personalization(s) from One Instance to other Instance
In other articles I have mentioned how to personalize OAF pages. Now we shall discuss how personalization is migrated from one instance to another.
The migration steps are given below.
Step 1: Retrieve the page hierarchy
We need to identify where and on which page the personalization has been done.
Navigate to the OAF Page on which personalization is done. In our case the page is Supplier Create page.
The notable personalizations done on this page are,
- The prompt, Name Pronunciation, has been changed to Pronunciation Name.
- The Field, Context Value , has been Hidden.
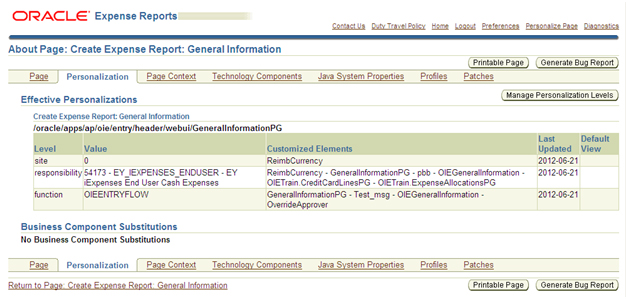
/oracle/apps/pos/supplier/webui/SuppCrtPG
The document name will be used in the next step as this is where the OAF page, SuppCrtPG, is located and the location of the personalization on this page within the personalization repository.
Note the function name on the page, OIEENTRYFLOW.
Note: The personalizations have been done at Function level. So we need to export the personalization done at this level
To check the personalizations on an OAF page you can execute a PL/SQL code in the database.
| 1 | BEGIN |
|---|---|
| 2 | jdr_utils.listcustomizations ('/oracle/apps/pos/supplier/webui/SuppCrtPG'); |
| 3 | END; |

1 /oracle/apps/pos/supplier/webui/customizations/function/POS_HT_SP_B_ORG_CRT/SuppCrtPG
2 /oracle/apps/pos/supplier/webui/customizations/site/0/SuppCrtPG
Step 2: Download the personalization
Now we shall download the personalization after locating it on the repository.
Create a Staging directory in the server with full permissions.
/Mokshith/Files/Personalizations/Perz
Change the Profile Value to the newly created Staging Directory.
Profile Name : FND: Personalization Document Root Path .
Go to Responsibility: Functional Administration
Navigation: Personalization > Import/Export > Personalization Repository
Then drill down as per the page hierarchy you had found in the earlier step.
We shall take the personalization done on the Function level by checking the “Select†box on the Page (The page name is GeneralInformationPG as shown in the previous step). You will notice the Last Updated date on the right hand side. The date also tells us whether we are looking at the correct OAF page or not.
Check the box for the OAF page whose personalization will be exported.
Now scroll down to the bottom.
Click on the button, Export to File System.
Exported 2 document(s) to /Mokshith/Files/Personalizations/Perz successfully. Note the message,
1 /oracle/apps/pos/supplier/webui/customizations/function/POS_HT_SP_B_ORG_CRT/SuppCrtPG
2 /oracle/apps/pos/supplier/webui/customizations/site/0/SuppCrtPG
Step 3: Locate the personalization file on the server
Now we shall see where the file has been generated.
Login to Unix and go to the path /Mokshith/Files/Personalizations/Perz (This path is given by in the previous step)
cd /Mokshith/Files/Personalizations/Perz
Now go the personalization path, /oracle/apps/pos/supplier/webui/customizations/function/POS_HT_SP_B_ORG_CRT/.
cd /oracle/apps/pos/supplier/webui/customizations/function/POS_HT_SP_B_ORG_CRT/
Now check the contents of the directory.
As you can see a file, SuppCrtPG.xml, exists in this directory. This xml file contains the personalization set.
Now go the personalization path, /oracle/apps/pos/supplier/webui/customizations/site/0/.
cd /oracle/apps/pos/supplier/webui/customizations/site/0/
Now check the contents of the directory.
As you can see a file, SuppCrtPG.xml, exists in this directory. This xml file contains the personalization set.
Step 4: Review the exported file
We shall FTP the entire directory structure to a local PC and review the XML file. For this task I prefer to use a tool called Core FTP Lite as it is free and I can transfer an entire directory structure from and to the local pc.
After transferring the directory structure to your local pc,
Now open the file, SuppCrtPG.xml in any text editor.
1, BEGIN
2, jdr_utils.printdocument ('/oracle/apps/pos/supplier/webui/customizations/site/0/SuppCrtPG');
3, END;
1, BEGIN
2, jdr_utils.printdocument ('/oracle/apps/pos/supplier/webui/customizations/function/POS_HT_SP_B_ORG_CRT/SuppCrtPG');
3, END;
On executing this anonymous block the output will be the same as the exported XML file.
Give these folder to DBA to Migrate.
Create a Staging Directory with full permissions in the destination server
Change the Profile Value to the newly created Staging Directory
Profile Name : FND: Personalization Document Root Path
Go to Functional Administrator Responsibility => Personalization => Import/Export
Click on Select all
Click on Export to File System

Create a Staging Directory with full permissions in the destination server
Please the folder with the newly created personalization's in this staging directory
Change the Profile Value to the newly created Staging Directory
Profile Name : FND: Personalization Document Root Path
Go to Functional Administrator Responsibility => Personalization => Import/Export => Exported Personalization's
Then drill down as per the page hierarchy to found the below 2 files which you got by running the list customizations.
/oracle/apps/pos/supplier/webui/customizations/function/POS_HT_SP_B_ORG_CRT/SuppCrtPG
/oracle/apps/pos/supplier/webui/customizations/site/0/SuppCrtPG
Then select these page as shown below.
 Click on Import from File System
 Bounce the Application
Now Execute the below statement in Toad to verify the imported personalization's
BEGIN
jdr_utils.listcustomizations ('/oracle/apps/pos/supplier/webui/SuppCrtPG');
END;
The output will look like the following,
/oracle/apps/pos/supplier/webui/customizations/function/POS_HT_SP_B_ORG_CRT/SuppCrtPG
/oracle/apps/pos/supplier/webui/customizations/site/0/SuppCrtPG
Now Navigate to your page to see the changes.
OA Frame Work Page Structure
Basics of Page Rendering
For understanding the process of page rendering, it is very important to know the structure of an OAF page.
Structure of an OA Framework Page
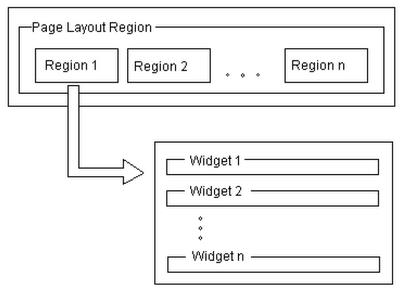
An OA Framework page has a collection of web beans or widgets like text boxes, buttons, etc. Every OAF page has containers for maintaining these widgets known as regions. And there always exists a parent region of all the regions known as the page layout region. This page layout region is one for every OAF page and is also the point where the Application Module is linked to the page.
Every region has a property of containing other regions and web beans. A controller object may be defined for every region that exists on the page. The following diagram highlights the structure of an OA Page:-
Processing Page Requests
The main OA Framework Page processing class is the oracle.apps.fnd.framework.webui.OAPageBean. This class uses the page name to determine which root AM is needed, so that AM can be fetched from the AM pool. The page layout region of the page actually holds the details of the AM to which the page is attached. Further, the chosen AM picks a JDBC connection, from the JDBC Connection Pool, to establish a transaction context for the page. Now depending on the valid login and request parameters, it is decided whether the request is a POST or a GET.
During both kinds of requests, the OAPageBean calls the code in the controller to instantiate each of the beans, along with setting of their appropriate properties. Certain methods which are not defined in the controller are also called for instantiating complex web beans.
GET Request
- When a request for a page is issued for the first time, the page’s declarative metadata definition is read to create the web bean hierarchy.
- The OAPageBean class calls the page initialization code for the page in the following manner:-
- Calling the processRequest() function of the controller of the page layout region.
- Calling prepareForRendering() for complex web beans
- Recursive calls to processRequest() for each of the beans in the hierarchy (if the associated controller objects are present).
- When this page processing completes, the OAPageBean hands this processed XML to the UIX which renders it in the form of HTML on the browser.
POST Request
- When a submit command is fired on the page, the POST request processing starts with recreation of the web bean hierarchy if one is not present.
- A call to processFormData() is made to write the data to the model, and this method is called recursively on all the web beans recursively.
- All the attribute and entry level validations are undertaken during calls to processFormData() and if any errors exist, appropriate exceptions are fired.
- A call to processFormRequest() of the controller is made recursively for all the web beans.
- V When this page processing completes, the OAPageBean hands this processed XML to the UIX which renders it in the form of HTML on the browser
The OAPageContext
The Page Context class is one of most important components of the entire machinery, and plays the part of the binding glue to all the above mentioned components. The following class diagram explains the role of the OAPageContext class in the machinery.

Accessing request parameters
One of the methods provided by the OAPageContext class, namely getParameter(), allows us to extract values of the web beans entered at the form level and use it inside the controller code for processing.
Getting access to the root AM
The contoller has to call the appropriate method of the Application Module for execution of the right database activity like calling database procedures, etc. Access to the instance of the AM is given to the controller using the OAPageContext. By firing the getRootApplicationModule() method on the OAPageContext, a reference to the AM is provided to the controller in its local instance of the AM.
Navigation and forwarding
Navigating across pages in an application is a necessary feature. This functionality is given life by the OAPageContext. The setForwardURL() method effects the feature of page navigation. The basic input parameters to the page include the server path of the target page, session level parameters to the page and a flag to determine whether the AM should be maintained for the next page.
Accessing application context information
Session level information, which needs to remain available across pages, constitutes the application context information. This is also stored and transferred by the OAPageContext. The information may either be inherent attribute values like user ID, employee details or user-defined values put in the session by controller or AM code.
Profile Option
| Profile Option Name | Value | Comments |
|---|---|---|
| Personalize Self-Service Defn | Yes | This is to turn on personalization at user/responsibility/site level etc |
| FND: Personalization Seeding Mode | Yes | This is to be able to create User views in search query regions |
| Create Seeded Personalizations | Yes | This is to be able to create User views in search query regions |
| Disable Self-Service Personal | Yes | This is to turn off personalizations completely. |
| FND: Personalization Region Link Enabled | Yes | This will enable the personalizations link above each region in a page if the profile option is enabled. |
| FND Diagnostics | Yes | This will enable the about this page link |
Hello World
Go to …/Jdevbin/jdev/bin
Double click on Jdevw.exe
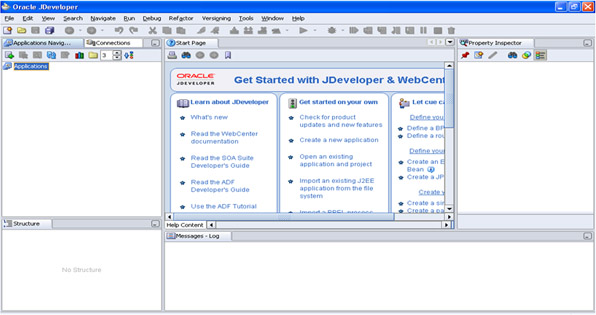
Go to FILE ->NEW -> Workspace Configured for Oracle Applications
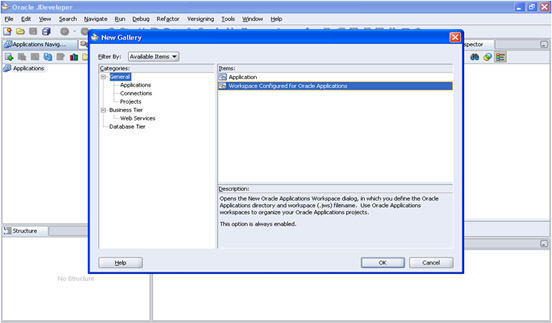
Click OK
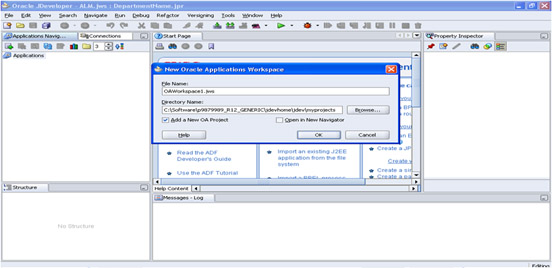
Give the name to the workspace (File Name)
Select Add New OA Project
Click OK
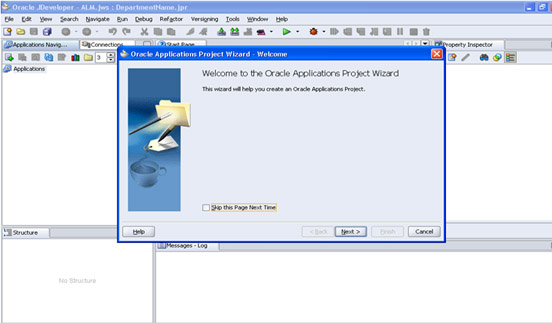
Click Next
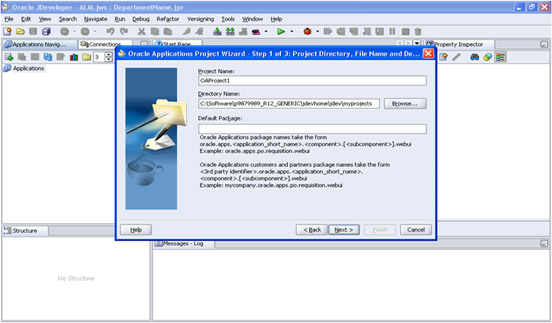
Give the Project Name and Default Package Name
Default Package Name: (Name related to Custom Task).oracle.apps.(Application short name).(Name Related to Task).webui
Click Next
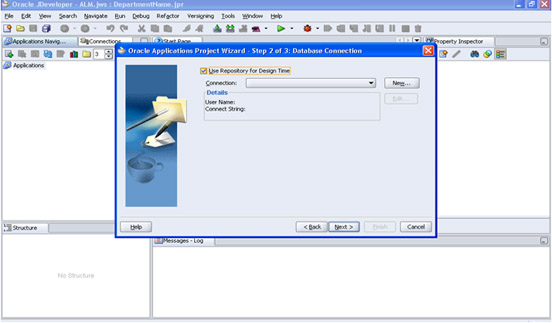
Select “Use Repository for Design”
Click on “New”

Click Next
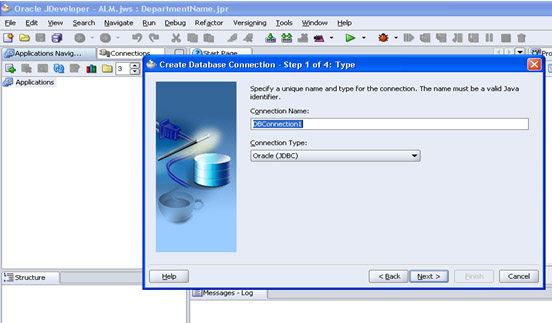
Give the name to the connection (This name can be used in further connections)
Click Next
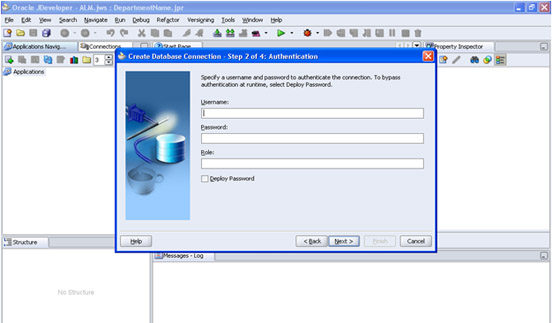
Give the user name and password of data base.
Click Next
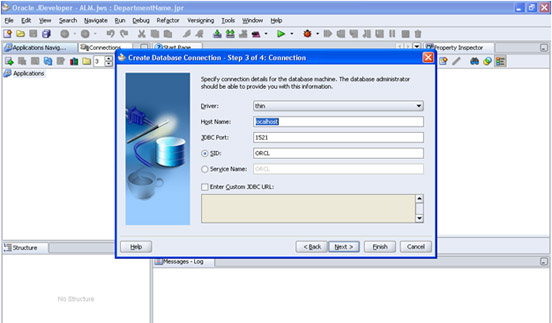
Give the Host Name, JDBC Port and SID of the Data Base
Click Next
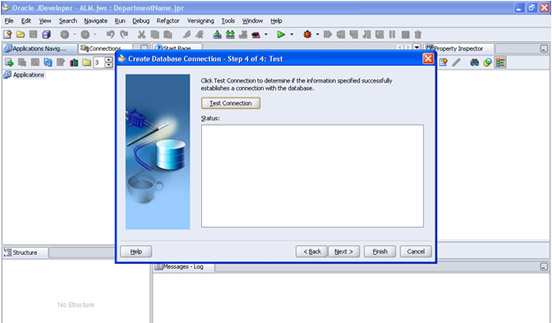
Click On Test Connection
If it is successful then click on finish
If not check for the username, password, host, port and Sid whether you gave correctly or not.
You can check these from the dbc file
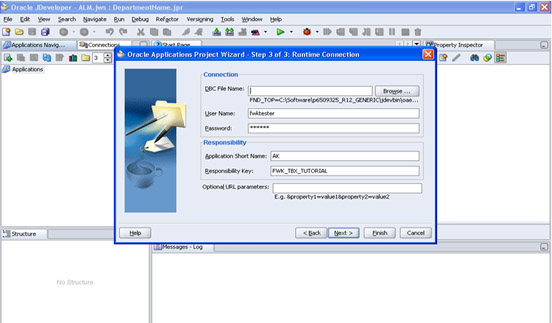
Give the path of the dbc file
It is like …./Jdevhome/jdev/dbc_files/secure/*****.dbc
Give the Application login user name and Password.
Give the Application Short Name and Responsibility Key.
Click Next
Click Finish
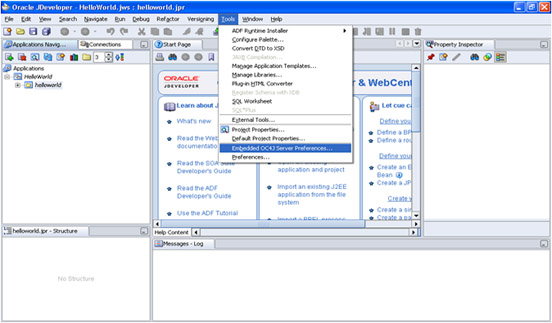
Click on Tools ->Embedded OC4j Server Preferences..
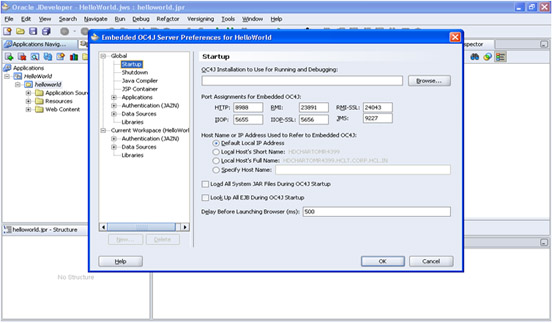
Click on Start up
Select Default Local IP Address and click on OK
While Running the [age if you got any error then change it to Local Host’s Short Name/Full Name
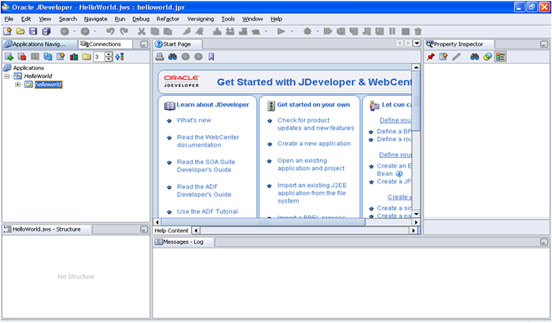
In the Left Side Below to Applications you can find Tree like structure
Applications
HelloWorld (It is nothing but your work space)
helloworld (It is nothing but your project)
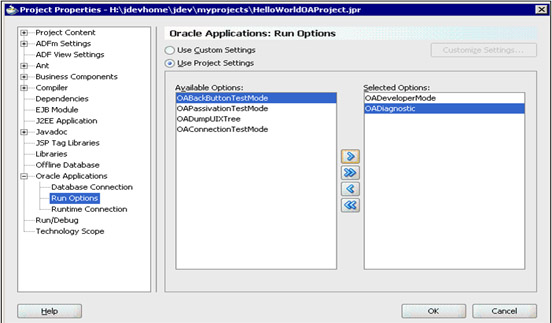
Place the mouse on project and right click -> Properties
And set the run time options as shown below
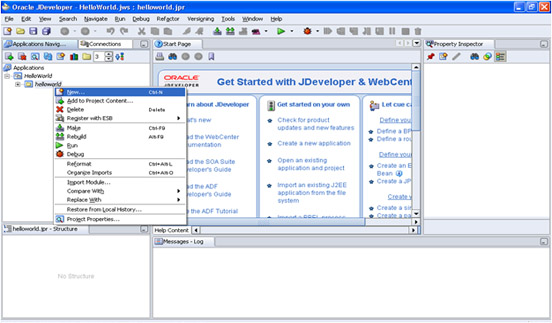
Place the mouse on project and right click
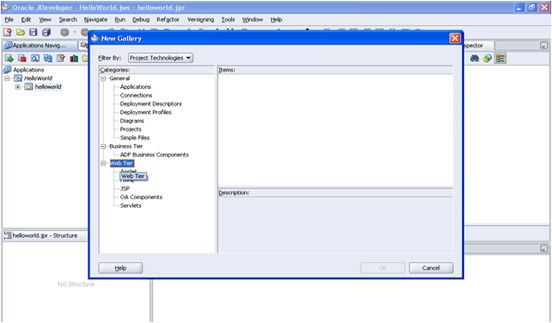
Expand Web Tier (as shown above)
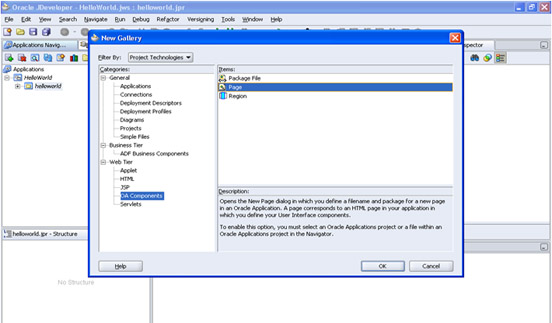
Select OA Components (As shown above).
Select Page
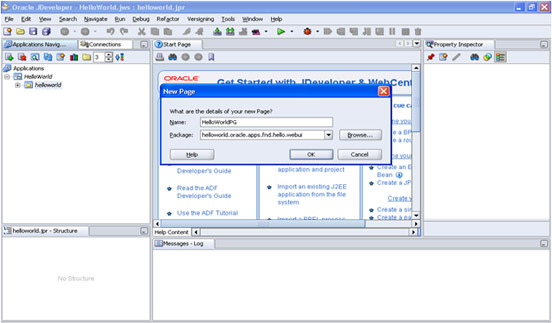
Give the name for the Page
Place the mouse on project
Right Click ->New
Expand Business Tier->ADF Business Component
Select Application Module
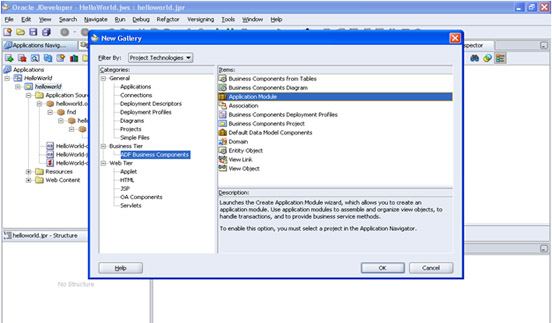
Click OK
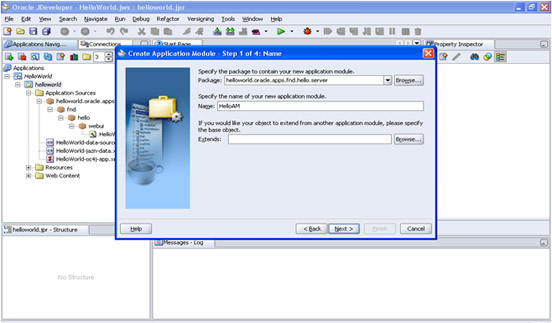
Give the package name as
(Name related to Custom Task).oracle.apps.(Application short name).(Name Related to Task).server
Give the Application Module Name
Click Next -> Next-> Next-> Next -> Finish
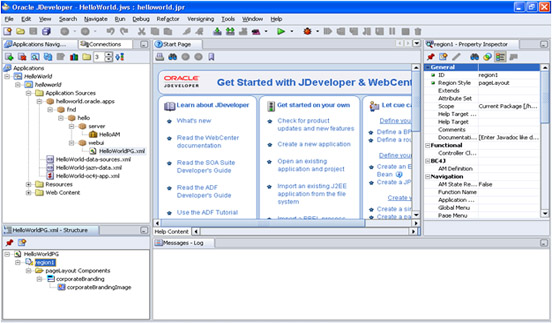
Place the Mouse on HelloWorldPG.xml in Navigation Panel
Place the Mouse on region1 in the Structure Panel
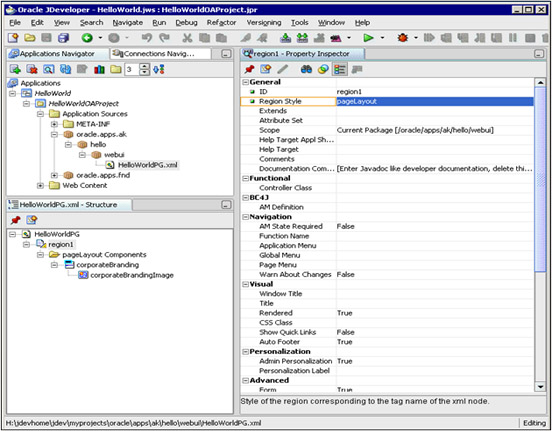
In the properties panel set the ID property to PageLayoutRN
In the properties panel set the Window Title property to “Hello World Page “
In the properties panel set the Title property to “My First Hello World Page “
In the properties panel set the AM Definition property to “helloworld.oracle.apps.fnd.hello.server.HelloAM“
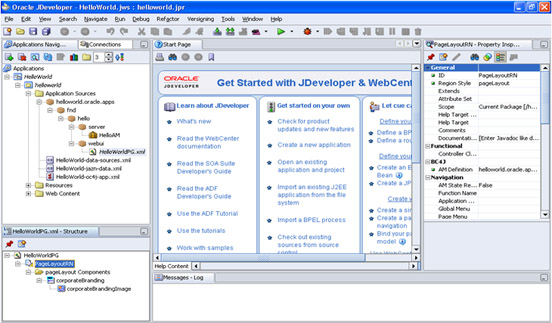
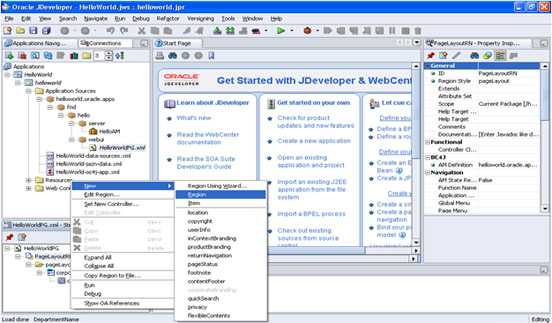
Place the Mouse on “PageLayoutRN” Right Click -> New ->Region
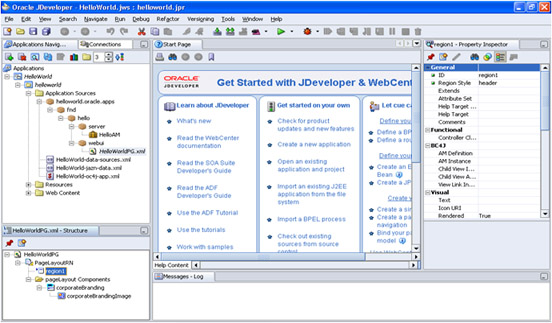
In the properties panel set the ID property to “MainRN”
In the properties panel set the Region Style as property to “messageComponentLayout “
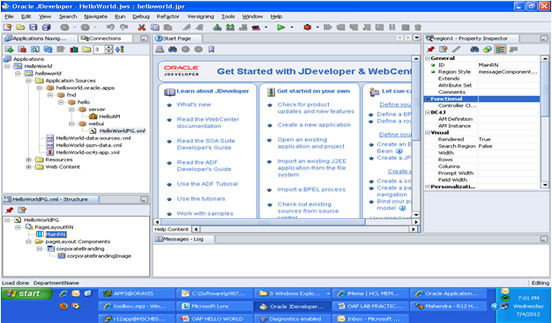
In the properties panel set the ID property to “EmpName”
In the properties panel set the Prompt as “Name”
Select MainRN ->New > messageLayout
Set its id property as “ButtonLayOut”
Select ButtonLayOut -> New->Item
Set the value of the ID property to Go.
Set the Item Style property to submitButton.
Set the Attribute Set property to /oracle/apps/fnd/attributesets/Buttons/Go.
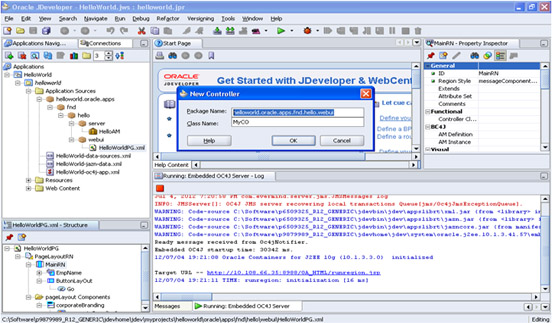
Select MainRN ->Add New Controller..
Set the Package name as “helloworld.oracle.apps.fnd.hello.webui “
Set the Class Name
Open HelloWorldCO.java
Add the below import statement
import oracle.apps.fnd.framework.OAException;
In the Process Form Request Method write down the below code :
if (pageContext.getParameter("Go") != null)
{
String EmpName = pageContext.getParameter("EmpName");
String message = "Hello, " + EmpName + "!"; throw new OAException(message, OAException.INFORMATION);
}
Place the mouse on project ,Right Click ->rubuild Save the Work
Place the Mouse on HelloWorldPG.xml in Navigation Panel
Right Click -> Run
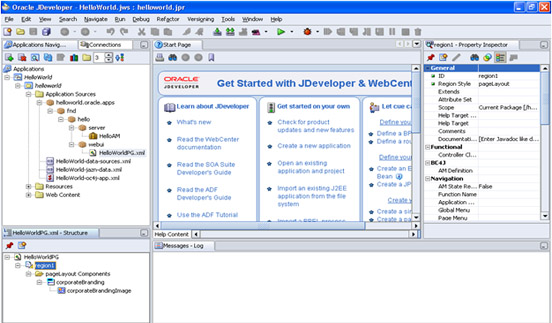

For a complete detail of the Hello World, If you liked this reading then you can download a PDF version of this wonderful guide : Hello World, in PDF
OAF SIMPLE SEARCH EMPLOYEE MESSAGE CHOICE AND LOV
Go to …/Jdevbin/jdev/bin
Double click on Jdevw.exe

Go to FILE ->NEW -> Workspace Configured for Oracle Applications

Click OK

Give the name to the workspace (File Name)
Select Add New OA Project
Click OK

Click Next

Give the Project Name and Default Package Name
Default Package Name: (Name related to Custom Task).oracle.apps.(Application short name).(Name Related to Task).webui
Click Next

Select “Use Repository for Design”
Click on “New”

Click Next

Give the name to the connection (This name can be used in further connections)
Click Next

Give the user name and password of data base.
Click Next

Give the Host Name, JDBC Port and SID of the Data Base
Click Next

Click On Test Connection
If it is successful then click on finish
If not check for the username, password, host, port and Sid whether you gave correctly or not.
You can check these from the dbc file

Give the path of the dbc file
It is like …./Jdevhome/jdev/dbc_files/secure/*****.dbc
Give the Application login user name and Password.
Give the Application Short Name and Responsibility Key.
Click Next
Click Finish
Click on Tools ->Embedded OC4j Server Preferences..


Click on Start up
Select Default Local IP Address and click on OK
While Running the age if you got any error then change it to Local Host’s Short Name/Full Name

In the Left Side Below to Applications you can find Tree like structure Applications
SearchEmployee(It is nothing but your work space)
Search(It is nothing but your project)

Place the mouse on project and right click -> Properties
And set the run time options as shown below

Place the mouse on project and right click
Click on New
Expand Web Tier (as shown below)
Select OA Components (As shown above).
Select Page

Give the name for the Page
Place the mouse on project
Right Click ->New
Expand Business Tier ->ADF Business Component
Select Application Module
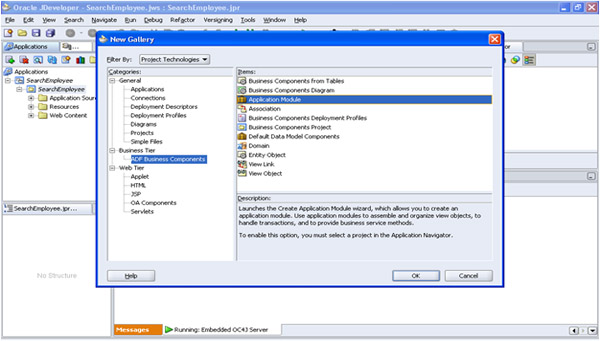
Click OK
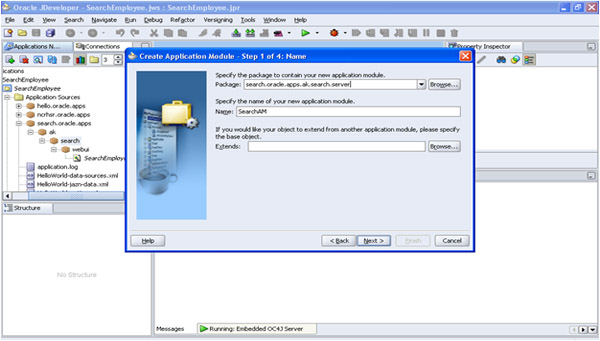
Give the package name as
search.oracle.apps.ak.search.server
Give the Application Module Name : SearchAM
Click Next-> Next ->Next ->Next->Finish
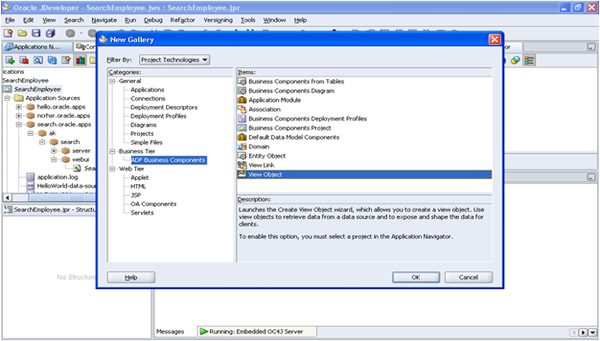
Place the mouse on project
Right Click ->New
Expand Business Tier->ADF Business Component
Select View Object
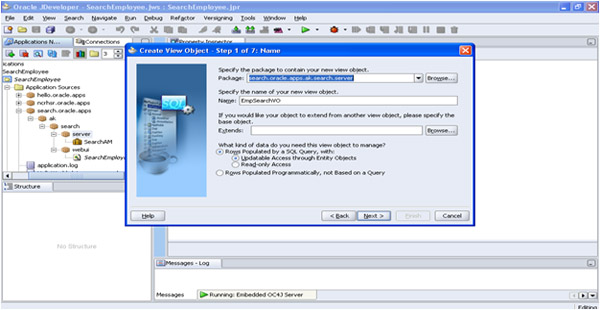
Package : search.oracle.apps.ak.search.server
Name : SearchEmpVO
Click Next ->Next->Next->Next
Query Statement : select * from emp
Click Next->Next->Next
Select Generate Java Files under View Row Class
Click Next->Finish
Place the mouse on project
Right Click->New
Expand Business Tier->ADF Business Component
Select View Object
Package : search.oracle.apps.ak.search.server
Name : EmpNumberVO
Click Next->Next->Next->Next
Query Statement : select * from emp
Click Next -> Next->Next
Select Generate Java Files under View Row Class
Click Next ->Finish
Place the mouse on project
Right Click ->New
Expand Business Tier->ADF Business Component
Select View Object
Package : search.oracle.apps.ak.search.server
Name : EmpNameVO
Click Next->Next->Next->Next
Query Statement : select * from emp
Click Next->Next->Next
Select Generate Java Files under View Row Class
Click Next ->Finish
Right click on SearchAM & click Edit SearchAM . Whenever a VO is created it needs to be associated with the AM before use.
Select Data Model in the window
Shuttle the SearchEmpVO, EmpNumberVO, EmpNameVO to the right side and click Ok.
Place the Mouse on SearchEmployeePG.xml in Navigation Panel
Place the Mouse on region1 in the Structure Panel
In the properties panel,
Set the Scope as Public
set the ID property to PageLayoutRN
In the properties panel set the Window Title property to “Search Employee Message Choice And LOV“
In the properties panel set the Title property to “Search Employee Message Choice And LOV “
In the properties panel set the AM Definition property to “search.oracle.apps.ak.search.server.SearchAM“
Place the mouse on project and right click
Click on New
Expand Web Tier (as shown below)
Select OA Components (As shown below).
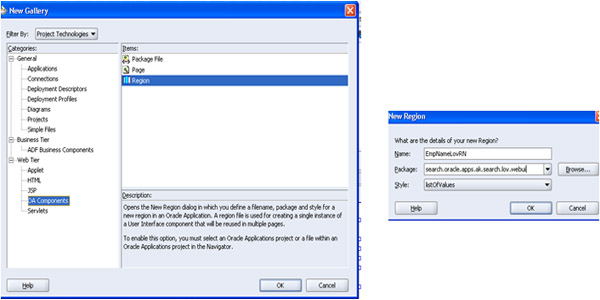
Select Region
Click Ok
Name EmpNameLOVRN
Package search.oracle.apps.ak.search.lov.webui
Style listOfValues>
Click Ok
Place the Mouse on EmpNameLOVRN.xml in Navigation Panel
Right Click on EmpNameLOVRN structure Panel
New->table Using Wizard
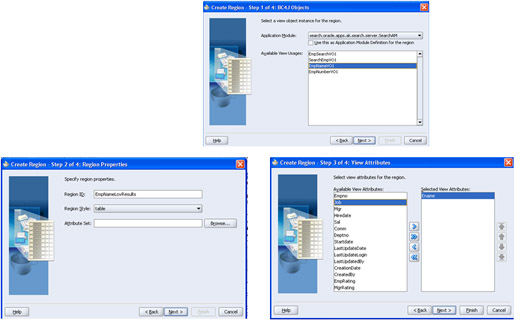
AM : search.oracle.apps.ak.search.server.SearchAM
Available View Usage : EmpNameVO1
Click Next
Region Id : EmpNameLovResults
Region Style : table
Click Next
Shuttle Ename from left to right
Click Next->Next->Finish
Select Ename from EmpNameLovResults
In Properties panel Change the below properties for Ename
Search Allowed : True
Selective Search Criteria : True
Prompt : Employee Name
Place the Mouse on SearchEmployeePG.xml in Navigation Panel
Place the Mouse on PageLayoutRN
AM Definition: Select SearchAM(in properties panel)
Right Click PageLayoutRN ->New -> Region
In the properties panel change item properties as below.
Id –QueryRN Region style : query
Construction Mode : autoCustomizationCriteria
Place the Mouse on SearchEmployeePG.xml in Navigation Panel
Place the Mouse on QueryRN
Right Click ->New->Region Using Wizard
Application Module : Select SearchAM
Select EmpSearchVO1
Click Next
RegionID : SearchResultsTable
Region Style : Table
Click Next
Shuttle the attributes to the right side which you want to display as search result.
Click Next.
Change the item style of all the attributes to messageStyledText and set the Prompt as how you want to display.
Click Finish
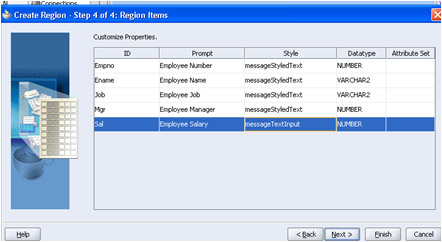
Select QueryRN -> New ->simplSearchPanel
Select region2 and change it’s ID to SimpleSearchHeader
Select region1 and change it’s ID to EmployeeSearch
Select EmployeeSearch ->New ->messageChoice
Set the Item id property to EmployeeNumber.
set the prompt as : Employee Number
Set the Picklist View Instance to : SearchEmpVO1
Set the Picklist Display Attribute to : Empno
Set the Picklist Value Attribute to : Empno
Select QueryRN ->New ->simplSearchMappings
Select queryCriteriaMap1and change it’s ID to EmpNumberMap
Select Search Item as EmployeeNumber
Select Result Item as Empno
Select QueryRN
Select EmployeeSearchàNewàmessageLoInput
Set the Item id property to EmployeeName.
Set the prompt as : Employee Name
Set the External LOV to : /search/oracle/apps/ak/search/lov/webui/EmpNameLOVRN
Search Allowed : True
Selective Search Criteria : True
Select QueryRN
Select simplSearchMappings->New->queryCriteriaMap
Select queryCriteriaMap2 and change it’s ID to EmpNameSearchMap
Select Search Item as EmployeeName
Select Result Item as Ename
Place the Mouse on SearchEmployeePG.xml in Navigation Panel
Right Click-> Run
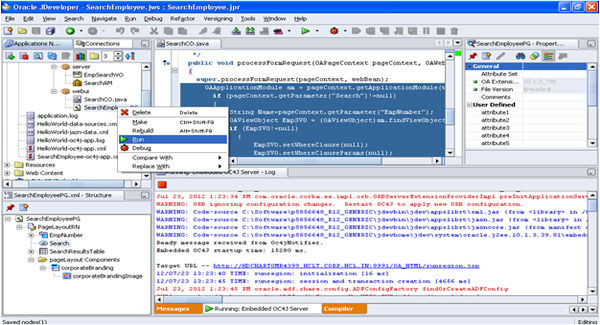
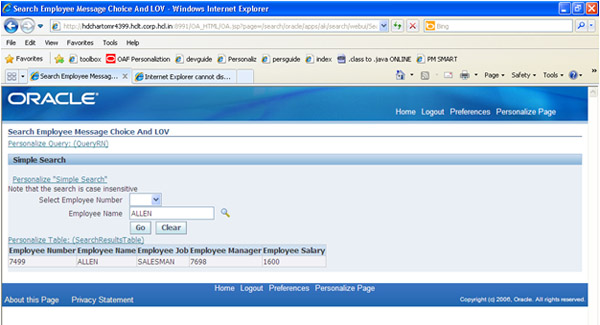
For a complete detail of the OAF SEARCH PAGE, If you liked this reading then you can download a PDF version of this wonderful guide : OAF SEARCH PAGE in PDF
ORACLE APP FRAME LAB BASICS
How to find the Jdeveloper Version

Login to the application
Set the FND: Diagnostics Profile Option as “YES” to see About this Page link
Click on the “About this Page”


Click on Technology Components

Takedown the version of the OA Framework and check the JDEVELOPER version for the same OAF Version in the Doc Id: 416708.1

Download the JDEVELOPER Patch from the My Oracle Support

Extract this into local system
How to find the correct dbc file

Click on Page Context.
Copy the path of the Database from the above screen.
Ask the DBA’s for the same dbc file.
Place this dbc file into ………/Jdevhome/jdev/dbc_files/secure
How to find the Application Short Name and Responsibility Key
There are 2 ways to find the Application short name and Responsibility Key
1, Getting from back end(DB)
2, Getting from the Application

To get the App Short Name and Resp Key from DB we need the Application Login Credentials which we are going to use while creating the OAProject thru JDeveloper
Getting from back end(DB): Use the below Query

SELECT FRESP.RESPONSIBILITY_KEY,FRESP.APPLICATION_ID,FAPP.APPLICATION_SHORT_NAME

FROM FND_RESPONSIBILITY FRESP,FND_APPLICATION FAPP WHERE RESPONSIBILITY_ID in(select RESPONSIBILITY_ID FROM FND_USER_RESP_GROUPS_DIRECT  WHERE  user_id=(select user_id  FROM fnd_user  WHERE user_name='MK250240')) AND FAPP.APPLICATION_ID in(select RESPONSIBILITY_APPLICATION_ID from    FND_USER_RESP_GROUPS_DIRECT where user_id=(select user_id from fnd_user where user_name='MK250240'))

AND FRESP.APPLICATION_ID =FAPP.APPLICATION_ID

Note : MK250240 is Application Login User Name
Getting from the Application
Application Short Name :

Application Short Name : EAM (From the above screen)
Responsibility Key :

Responsibility Key : MSU_VIS_OPS (From the above screen)
For a complete detail of the OAF Lab BASIC, If you liked this reading then you can download a PDF version of this wonderful
guide : OAF Lab BASIC in PDF
Partial Page Rendering in OAF Page
Method1
Let us try to implement partial page rendering for a text item.

If value of TextItem1 is null then TextItem2 will not be appeared on UI.

If value of TextItem1 is not null then TextItem2 will be appeared on UI.
1. Create a New OA Workspace and Empty OA Project
File> New > General> Workspace Configured for Oracle Applications
File Name -- PPRProj
Project Name – PPRDemoProj
Default Package -- mahi.oracle.apps.fnd.pprdemo
2. Create Application Module AM
PPRDemoProj right click > New > ADF Business Components > Application Module
Name -- PPRAM
Package -- mahi.oracle.apps.fnd.pprdemo.server
Check Application Module Class: PPRAMImpl Generate JavaFile(s)
3. Create a PPRVO View Object
PPRDemoProj> New > ADF Business Components > View Objects
Name – PPRVO
Package – mahi.oracle.apps.fnd.pprdemo.server

In Attribute Page
Click on New button and create transient primary key attribute with the following properties:
| Attribute | Property |
| Name | RowKey |
| Type | Number |
| Updateable | Always |
| Key Attribute | (Checked) |
Click New button again and create transient attribute with the following properties:
| Attribute | Property |
| Name | TextItem2Render |
| Type | Boolean |
| Updateable | Always |
Note – No Need to generate any JAVA files for PPRVO
4. Add Your View Object to Root UI Application Module
Right click on PPRAM > Edit PPRAM > Data Model >
Select PPRVO in Available View Objects list and shuttle to Data Model list
5. Create a OA components Page
PPRDemoProj right click > New > OA Components > Page
Name – PPRPG
Package -- mokshith.oracle.apps.fnd.pprdemo.webui
6. Modify the Page Layout (Top-level) Region
| Attribute | Property |
| ID | PageLayoutRN |
| Region Style | pageLayout |
| Form Property | True |
| Auto Footer | True |
| Window Title | PPR Demo Window Title True |
| Title | PPR Demo Page Headere |
| AM Definition | mokshith.oracle.apps.fnd.pprdemo.server.PPRAM |
7. Create the Second Region (Main Content Region)
Right click on PageLayoutRN > New > Region
| Attribute | Property |
| ID | MainRN |
| Region Style | messageComponentLayout |
8. Create Two Text Items
Create First messageTextItem --
Right click on MainRN > New > messageTextInput
| Attribute | Property |
| ID | TextItem1 |
| Region Style | messageTextInput |
| Property | Text Item1t |
| Length | 20 |
| Disable Server Side Validationh | True |
| Disable Client Side Validation | True |
| Action Type | firePartialAction |
| Event | TextItem1Change |
| Submit | True |
Note -- Disable Client Side Validation and Event property appears after you set
the Action Type property to firePartialAction
Create Second messageTextItem --
Select MainRN right click > New > messageTextInput
| Attribute | Property |
| ID | TextItem2 |
| Region Style | messageTextInput |
| Property | Text Item2 |
| Length | 20 |
| Rendered | ${oa.PPRVO1.TextItem2Render} |
9. Add Following code in PPRAMImpl.java
import oracle.apps.fnd.framework.OARow;
import oracle.apps.fnd.framework.OAViewObject;
import oracle.apps.fnd.framework.server.OAApplicationModuleImpl;
import oracle.apps.fnd.framework.server.OAViewObjectImpl;

public void handlePPRAction()
{
Number val = 1;
OAViewObject vo = (OAViewObject)findViewObject("PPRVO1");

 if (vo != null)
{
if (vo.getFetchedRowCount() == 0)
{
vo.setMaxFetchSize(0);
vo.executeQuery();
vo.insertRow(vo.createRow());
OARow row = (OARow)vo.first();

row.setAttribute("RowKey", val);
row.setAttribute("TextItem2Render", Boolean.FALSE);
}
}
}
10. Implement Controller for Page
Select PageLayoutRN in Structure pane right click > Set New Controller

Package Name -- mokshith.oracle.apps.fnd.pprdemo.webui

Class Name – PPRCO

Write following code in processFormRequest function of PPRCO Controller

import oracle.apps.fnd.framework.OARow;
import oracle.apps.fnd.framework.OAViewObject;


public void processRequest(OAPageContext pageContext, OAWebBean webBean)
{
super.processRequest(pageContext, webBean);
PPRAMImpl am = (PPRAMImpl)pageContext.getApplicationModule(webBean);

am.invokeMethod("handlePPRAction");
}

public void processFormRequest(OAPageContext pageContext, OAWebBean webBean)
{
super.processFormRequest(pageContext, webBean);

PPRAMImpl am = (PPRAMImpl)pageContext.getApplicationModule(webBean);
OAViewObject vo = (OAViewObject)am.findViewObject("PPRVO1");
OARow row = (OARow)vo.getCurrentRow();

if ("TextItem1Change".equals(pageContext.getParameter(EVENT_PARAM)))
{
if (pageContext.getParameter("TextItem1").equals(""))
{
row.setAttribute("TextItem2Render", Boolean.FALSE);
}
else
{
row.setAttribute("TextItem2Render", Boolean.TRUE);
}
}
}
11. Congratulation you have successfully finished. Run Your PPRPG page and Test Your Work


Method2
PPR (Partial Page Rendering) in OAF :

While developing pages, we may face some scenarios where the requirement is to make modifications on the current page itself, instead of navigating to different page. Such as selecting an item from a choice list might result in modifications to other fields or clicking a button to add a new row in table region and many more like these.
All these tasks can be performed by simply refreshing the page however this could result in performance issues. Another alternative is to use javaScript which will give faster results but implementing complex functions can be a tough job using javaScript.

UIX Framework provides a solution for this: Partial Page Rendering i.e. to re-render only a limited portion of a page.

Working of PPR :-

PPR is a three step process:

1) Partial page event

Partial page events are quite similar to full page events. However, there are two important differences between partial and full page events. First, partial page events specify partial page rendering-specific event parameters which are not present on the full page event equivalents. For example, partial page events may include an event parameter which identifies the set of partial targets, or nodes that should be re-rendered.
The second difference between partial page events an full page events is how the events are sent. Unlike full page events, partial page events must be sent in a way which does not force the browser to reload the current page. To implement this capability, UIX PPR uses a hidden iframe as a communication channel between the browser and the web application running on the middle-tier. Partial page events are sent by forcing a navigation in the hidden iframe, which in turns causes a request to be sent to the application on the middle-tier. Since the iframe is hidden, the process of sending a partial page event and rendering partial page contents can take place behind the scenes, without discarding the contents of the current page.

2) Partial Page Rendering Pass

When the partial page event is received by the application, the application responds by determining the set of partial targets to render and performing the partial page rendering pass. The partial page rendering pass is similar to a full page rendering pass. In both cases, the UINode tree is traversed by calling render() on each node in the tree. However, in the PPR case, only the contents generated by the partial targets are actually sent back to the browser. All other contents are dropped. So, the partial page response is generally much smaller, since only the modified contents are sent back to the browser.

3) Partial Page Replacement

When the browser receives the partial page response, the new contents for each partial target node are copied from the hidden iframe into the main browser window, replacing the existing contents for each target node. For example, in the table navigation case, rather than replacing the entire page, just the contents of the table itself are replaced.

Now lets create a simple page to implement PPR. In this page, there are 3 items (employee number, employee name & job). I have attach a PPR event on employee number field. Hence, user will enter the emp number and as soon as he tabs out, name and job will populate on their respective fields without refreshing the page.
1) Create a new OA page:
Right click on project (xxcus) --> New --> Web Tier --> OA Components --> select 'Page' item. Click OK. (This will open a popup window)
We are creating a page for implementing PPR, so specify the details of page as below:
Name: XxPprDemoPG
Package: xxcus.oracle.apps.fnd.pprdemo.webui
2) Create a new view objects (VO):
Right click --> New View Object (This will open a wizard having 7 steps).

Step 1
         Package: xxcus.oracle.apps.fnd.pprdemo.server
         Name: XxPprDemoVO
         Choose the radio button 'Read-only Access' (as no DML operation).
         Click Next.

Step 2
         Enter the below query in 'Query Statement':
               select EMPNO, ENAME, JOB from employee

Keep defaults for step3, 4, 5, 6 & 7 and click Finish. Save All.
3) Create a new Application Module (AM):
Step 1
         Package: xxcus.oracle.apps.fnd.pprdemo.server
         Name: XxPprDemoAM. Click Next.

Step 2
    Here we will add an instance of the VO created in (2). Select XxPprDemoVO from 'Available View Objects' and shuttle it to 'Data Model' using ">" button.
Keep defaults for all other steps (3, 4). Click Finish.
4) Create a new Controller (CO):
Right click on pageLayout region and create a new controller:
          Name: XxPprDemoCO
          package: xxcus.oracle.apps.fnd.pprdemo.webui
5) Creating the Page Layout & Setting its Properties :-
1) Create a new region under pageLayout of type defaultSingleColumn.
2) Create 3 items under defaultSingleColumn region (messageTextInput, messageStyledText, messageStyledText).

Now change the properties for each field from property inspector as shown below:

pageLayout:
             ID: pageLayoutRN
             AM Definition: xxcus.oracle.apps.fnd.pprdemo.server.XxPprDemoAM
             Window Title: PPR Demo Page
             Title: PPR Demo

defaultSingleColumn:
             ID: singleColRN
             Text: Enter Employee Number

messageTextInput (applied applied PPR event on this item):
             ID: Empno
  Prompt: Employee Number
  Action Type: firePartialAction
         Event: populateFields

messageStyledText (for Employee Name):
             ID: Ename
             Prompt: Employee Name
  View Instance: XxPprDemoVO1
     View Attribute: Ename

messageStyledText (for Job):
             ID: Job
             Prompt: Job
     View Instance: XxPprDemoVO1
     View Attribute: Job


The declarative page structure in jDev will be similar to as shown below:
We will capture populateFields event (PPR event) in PFR method of controller and call the appropriate method from
AMImpl class as shown in below code snippet:
public void processFormRequest(OAPageContext pageContext,
                               OAWebBean webBean) {
 super.processFormRequest(pageContext, webBean);

 OAApplicationModule am = pageContext.getRootApplicationModule();

 if ("populateFields".equals(pageContext.getParameter(EVENT_PARAM))) {
    String empNum = pageContext.getParameter("Empno");
    if (!("".equals(empNum.trim()))) {
       Serializable[] param = { empNum };
       String result =
         am.invokeMethod("firePprEvent", param).toString();
         if ("N".equals(result)) {
            throw new OAException("Please enter valid employee number.",
                                 OAException.ERROR);
        }
    } else {
        String empnum = null;
        Serializable[] param = { empnum };
        am.invokeMethod("firePprEvent", param);
        throw new OAException("Please enter employee number",
                        OAException.ERROR);
    }
 }

}
Code for firePprEvent method in XxPprDemoAMImpl.java file:
public String firePprEvent(String empNum) {
  try {
      XxPprDemoVOImpl vo = getXxPprDemoVO1();
      vo.setWhereClause(null);
      vo.setWhereClauseParams(null);
      vo.setWhereClause("EMPNO = :1");
      vo.setWhereClauseParam(0, empNum);
      vo.setMaxFetchSize(-1);
      vo.executeQuery();
      XxPprDemoVORowImpl row = (XxPprDemoVORowImpl)vo.first();
      if (row == null) {
          return "N";
      }
  } catch (Exception e) {
      e.printStackTrace();
  }
  return "Y";

}
User will enter employee number and tabs out. This will auto-populate the other two fields without full page refresh as shown below:
Method3
Programmatic PPR in OAF:
I was recently helping a friend in a customization in OAF, where through personalization, he wanted to put a ppr action in a seeded page in a seeded item. He was trying to do that customization using fire action, which was not acceptable by customer due to obvious reasons. Since, I think this section is missing in developers' guide, and is quite simple to approach, here is code you can write in process request of CO to attach programmatic PPR. lets take a simple example of attaching PPR to a message choice bean :

//In Process Request()
{
//Please attach PPR only to those UIX beans which support it
//otherwise it may not work
OAMessageChoiceBean mcb=(OAMessageChoiceBean)webBean.findChildRecursive("");
FireAction firePartialAction = new FirePartialAction("empPositionChange");
mcb.setAttributeValue(PRIMARY_CLIENT_ACTION_ATTR,firePartialAction);
}

//In process form request
if ("empPositionChange".equals(pageContext.getParameter(OAWebBeanConstants.EVENT_PARAM)))
{
//ur logic on PPR

//if PPR is attached in a table/hgrid child then we can find the row
//reference by
String rowReference =pageContext.getParameter(OAWebBeanConstants.EVENT_SOURCE_ROW_REFERENCE);
}
Similarities between OAF and ADF
      Both OAF and ADF follow industry best practices i.e. MVC standard(Model-View-Controller), for people who still don't have a fundamental understanding of MVC, i would suggest reading:

Article On Web-Tier Application Framework Design

Here are MVC layers of both:

OAF
--------
Model : All BC4J Component classes like AM,EO,VO,VL etc.
View : UIX
Controller : CO classes.

ADF
-----
Model : All BC4J Component classes like AM,EO,VO,VL etc.
View : JSF JSPs, in simple terms file with extension .jspx
Controller : Backing bean classes.

As we see above Model layer is same for both i.e. BC4J, hence OAF developers, have a added advantage since, working with OAF, they already have sound knowledge of this. Next comes the view layer thats changed from UIX to JSF.One major problem with UIX in OAF is that UI is not very extensive, in the sense that there are many limitations on UI front , while if you take JSF, its a Sun's standard j2ee technology where you can have all web features integrated and is also flexible enough to integrate UIs from other technologies.... like industry popular Flex, flash etc.Jsf is capable enough to deliver most complex and extensive UIs.

Now, as in OAF,most of the UI development is done through drag and drop and wizards in Jdeveloper(Or even if the page is dynamic you would write java code for adding various UIX beans to pagelayout region), hence, even if you don't have any knowledge/limited knowledge of xml and UIX, then also you can work with ease,because Jdeveloper generates the xml for you.The same is in the case of ADF,most(not all) UI development is done through wizards and drag-drop functionality in Jdeveloper.You only need to have bean level knowledge, similar to OAF.

The last layer, i.e. the controller layer is quite similar to what we code in CO classes in OAF, typically every page where you need to put event logic, you would need to attach a backing bean class to that jspx page. This can be automatically done through wizard in Jdeveloper.The backing bean class typically contain getter/setter methods of all beans in the page, so you can add your custom event methods to this class which will be attached to UI through EL.

I think by now you would have developed some comfort level with ADF! One stunning feature of ADF are the flow diagrams, like in OAF to redirect to diffent page you use vaious page forward apis' in pageContext class.In ADF, you can design the whole flow in flow-diagram, which is a completely drag and drop feature of Jdeveloper ad then attach it with action of any bean say a "command button", on whose submission you want to redirect the flow.

To start with example, Oracle provides a fantastic tutorial called SRDEMO. You can run it on your Jdev, read the guide and get aquittaned with ADF.

Recently, there was a discussion on "OAF Forum" regarding "Can ADF Faces/ADF BC aplications developed on Jdeveloper 10g can be deployed on Apps 11i?".

Here is the Steven Chan's blog comments link which gives you the answer:

He basically says "The E-Business Suite 11.5.10.2 uses Oracle9i Application Server 1.0.2.2.2 as its application tier server. You cannot use this to run externally-developed applications.

I would recommend running your custom application on an external Oracle Application Server 10g instance."

Another point is pointed by Tapash for Apache Jserv application server used in Oracle Apps 11i, he says "Apache JServ module , QApache are servers built at oracle not totally open sourced, so these are not pure J2EE servers, although you can run some J2EE components like jsps/servlets/EJBs, but these servers dont have containers for all J2EE components.". So, i would say Apache name is misleading, because Apache.org things immediately flicks my mind saying open source :)!

Hence, for Apps 11i version ADF faces can't be atleast in straight forward way be deployed. If you are using Apps 11i version , you should use external J2ee compliant server, like Apache Tomcat,OC4J etc. for hosting your ADF Faces/ ADF BC application.
This is not the case with Apps R12, which is a j2ee compliant server, hence you can deploy all ur ADF faces applications on the same application server.This is because of the fact Oracle has moved to OC4J application server with R12.

For a complete detail of the OAF BASIC1, If you liked this reading then you can download a PDF version of this wonderful guide : OAF BASIC1 in PDF
VO Row Iterator in Oaf
       //Create a object with name PayGrpGroupVO for the ViewInstance PayGrpGroupVO1
OAApplicationModule am = oapagecontext.getApplicationModule(oawebbean);
OADBTransaction oadbtransaction = am.getOADBTransaction();
OAViewObject PayGrpGroupVO = (OAViewObject)am.findViewObject("PayGrpGroupVO1");
if (PayGrpGroupVO!= null) //Check for null
PayGrpGroupVO.reset();         //It will take you to the first row of Vo

          while (PayGrpGroupVO.hasNext())
{
OARow PayGrpGroupVORow = (OARow)PayGrpGroupVO. next ();
//now we can use PayGrpGroupVORow.getAttributes, PayGrpGroupVORow.setAttributes
//for implementing our logic as shown below
String PayGroupCodeFormValue=(String)PayGrpGroupVORow.getAttribute("DisplayedField ");
PayGrpGroupVORow.setAttribute("DisplayedField","BIP");
}
Calling PL/SQL Function from OAF Page
To invoke a stored function  from within an entity object or an application module, you need to follow below steps:
1. Create a CallableStatement with the PL/SQL block containing the stored function  invocation
2. Bind any parameters ( IN or OUT )
3. Execute the statement.
4. Optionally retrieve the values of any OUT parameters or return value of function
5. Close the statement.

below example will exemplify the above steps

Stored Function Calling Code:
public void testFunction() {
     OADBTransaction txn = getDBTransaction();
     CallableStatement callableStatement =txn.createCallableStatement("begin :1 := xx_function(:2); end;",OADBTransaction.DEFAULT);
     try
     {
       callableStatement.registerOutParameter(1, Types.VARCHAR);
       callableStatement.setString(2, "mahi");
       String outParamValue = null;
       callableStatement.execute();
       outParamValue = callableStatement.getString(1);
       callableStatement.close();
     }
     catch (SQLException sqle)
    {
       callableStatement.close();
     }
   }
Calling PL/SQL Procedure from OAF Page
To invoke a stored procedure  from within an entity object or an application module, you need to follow below steps:
1. Create a CallableStatement with the PL/SQL block containing the stored procedure invocation
2. Bind any parameters ( IN or OUT )
3. Execute the statement.
4. Optionally retrieve the values of any OUT parameters or return value of function
5. Close the statement.

below example will exemplify the above steps

Stored Procedure with OUT parameter
public void testStoredProcedure() {

     OADBTransaction txn = getDBTransaction();
     CallableStatement callableStatement =txn.createCallableStatement("begin mmm_procedure(:1, :2); end;",OADBTransaction.DEFAULT);
     try
      {
       callableStatement.registerOutParameter(2, Types.VARCHAR);
       callableStatement.setString(1, "mahi");
       String outParamValue = null;
       callableStatement.execute();
       outParamValue = callableStatement.getString(1);
       callableStatement.close();
     }
     catch (SQLException sqle)
     {
       callableStatement.close();
     }
   }
Deploy OAF pages into Server
1. Copy all files from local machine to appropriate $JAVA_TOP directory
2. Compile all java files (Controller Files) with command javac
3, Call java importer to import all xml files
java oracle.jrad.tools.xml.importer.XMLImporter $JAVA_TOP/mokshith/oracle/apps/fnd/webui/HelloWorldPG.xml -username apps -password apps -dbconnection "(DESCRIPTION=(ADDRESS=(PROTOCOL=tcp)(HOST=
)(PORT= ))(CONNECT_DATA=(SID= )))" -rootdir $JAVA_TOP
4. Print Documents to check imported XML page content (Optional)
jdr_utils.printDocument('/mokshith/oracle/apps/fnd/webui/HelloWorldPG',1000)

Example –

DECLARE

BEGIN

jdr_utils.printDocument('/mokshith/oracle/apps/fnd/webui/HelloWorldPG',1000);

EXCEPTION

WHEN OTHERS THEN

DBMS_OUTPUT.PUT_LINE(SQLERRM);

END;

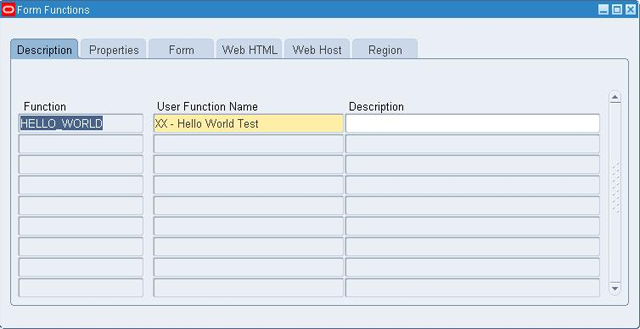
5. Create form function with property "SSWA jsp function" and webhtml "OA.jsp?page=/mokshith/oracle/apps/fnd/webui/HelloWorldPG"
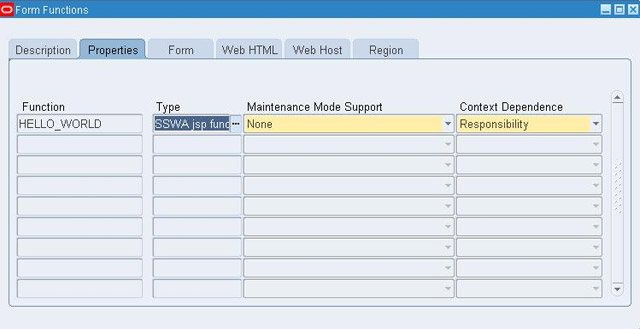

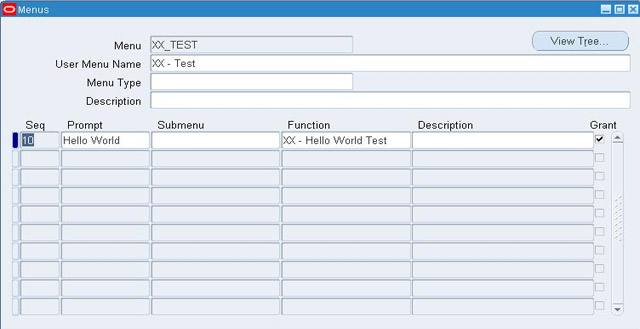
6. Add function to menu
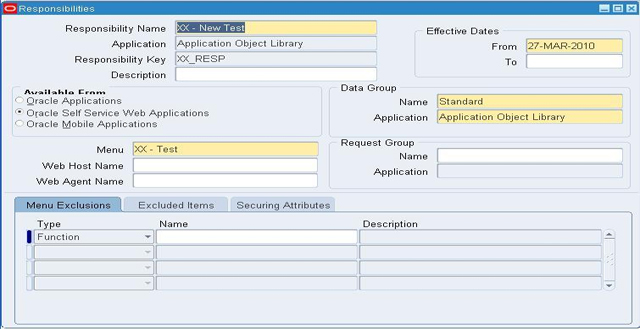
7. Add menu to responsibility
Integrate XML Publisher and OA Framework
The oracle applications is continuously evolving with the use of new technologies.

It is shifting from a traditional form based application to a self service web based application using Oracle Applications Framework (OAF) .

Every application requires a seamless integration with the reporting tools.
OA Framework seamlessly integrates with XML Publisher to fulfill the Oracle Applications reporting requirement.
In this article we will discuss in detail the integration of OA Framework and XML Publisher with an example.
It is assumed that the reader has basic understanding of OA Framework and XML Publisher.

The article has the following section

1) XML Publisher Architecture
2) Designing the OAF BC4J Data Model.
3) Designing the OAF Page and generating the Data XML
4) Designing the RTF Template using Data XML
5) Registering the Template with Oracle Applications.
6) Integrating the OAF page With XML Publisher.
7) Invoking the report from OAF
Step 1 : XML Publisher Reporting Architecture
An XML publisher report consist of a report template designed in RTF or PDF Formatand a Data XML file. The template
contains the report layout. During execution the Data XML File is merged with the template to generate a
PDF, HTML, EXCEL or RTF report.
Step 2: Designing the OAF BC4J Data Model.
Using jdeveloper create a ViewObject EmpVO using the below query and associate it to ApplicationModule EmpAM.

SELECT empno,ename,job,mgr,hiredate,comm,deptno FROM emp

The Jdevloper should look like this
Step 3 : Generating the XML for Template Design
Design a OAF Page EmpPG with the Following Code in the Controller EmpCO.
EmpCO :

public void processRequest(OAPageContext pageContext, OAWebBean webBean)
{
super.processRequest(pageContext, webBean);
OAApplicationModuleImpl am= (OAApplicationModuleImpl)pageContext.getApplicationModule(webBean);
am.invokeMethod("initEmpVO");
am.invokeMethod("getEmpDataXML");
}
EmpAMImpl :

public void initEmpVO()
{
EmpVOImpl vo = getEmpVO1();
if(vo == null)
{
MessageToken errTokens[] = {
new MessageToken("OBJECT_NAME", "EmpVO1")
};
throw new OAException("AK", "FWK_TBX_OBJECT_NOT_FOUND", errTokens);
} else
{
vo.executeQuery();
}
}
public void getEmpDataXML()
{
try {
ByteArrayOutputStream outputStream = new ByteArrayOutputStream();
OAViewObject vo = (OAViewObject)findViewObject("EmpVO1");
((XMLNode) vo.writeXML(4, XMLInterface.XML_OPT_ALL_ROWS)).print(outputStream);
System.out.println(outputStream.toString());
}
catch(Exception e)
{
throw new OAException (e.getMessage());
}
}
On running the page , the data xml file will be printed on the Jdeveloper Embeded OC4J Sever Log
(since i have used System.out.println). The XML file will be like


7369
SMITH
CLERK
7902
1980-12-17
20


7499
ALLEN
SALESMAN
7698
1981-02-20
300
30


7521
WARD
SALESMAN
7698
1981-02-22
500
30
COStep 4 : Designing the Template
Install the Oracle XML Publisher Desktop available via patch 5887917. Open the Microsoft word. You should be able to see
the following menus and toolbars.

Using the menu Data -> Load XML Data... , load the XML File generated from Jdeveloper

If the XML files gets loaded successfully, then you should get the below confirmation.
Using the Table Wizard as below to create the 'Table Report Format' with all the columns of EMP.
The Table Report Format Template should be like

Save the document as Emp.rtf. Preview the report as PDF, XML, HTMl or RTF.
Step 5 : Registering the Template with Oracle Applications.
Login with a user having "XML Publisher Administrator" Responsibility.Navigate to Home --> Data Definition and define
the data definition.

Navigate to Home --> Template and Define the Template
Step 7 : Integrating the OAF page With XML Publisher
Design the EmpPG page to appear as shown below.
Set the Action Type and Event property of the Tourch Image Item to FireAction and GenerateReport respectively.
Modify the Controller and ApplicationModule as below

Imports :
import oracle.xml.parser.v2.XMLNode;
import java.io.ByteArrayInputStream;
import java.io.ByteArrayOutputStream;
import javax.servlet.ServletOutputStream;
import javax.servlet.http.HttpServletResponse;
import oracle.apps.xdo.XDOException;
import oracle.apps.xdo.oa.schema.server.TemplateHelper;
import oracle.cabo.ui.data.DataObject;
import oracle.jbo.XMLInterface;

EmpCO :
private static final int DEPTH = 4;
private static final int APP_ID = 20035;
private static final String APP_NAME = "XXIGS";
private static final String TEMPLATE_CODE = "Emp_Template";
private static final int BUFFER_SIZE = 32000;

public void processRequest(OAPageContext pageContext, OAWebBean webBean)
{
super.processRequest(pageContext, webBean);
OAApplicationModuleImpl am= (OAApplicationModuleImpl)pageContext.getApplicationModule(webBean);
am.invokeMethod("initEmpVO");
}
public void processFormRequest(OAPageContext pageContext, OAWebBean webBean)
{
super.processFormRequest(pageContext, webBean);
OAApplicationModuleImpl am= (OAApplicationModuleImpl)pageContext.getApplicationModule(webBean);

String event = pageContext.getParameter("event");
if("GenerateReport".equals(event))
{

// Get the HttpServletResponse object from the PageContext. The report output is written to HttpServletResponse.
DataObject sessionDictionary = (DataObject)pageContext.getNamedDataObject("_SessionParameters");
HttpServletResponse response = (HttpServletResponse)sessionDictionary.selectValue(null,"HttpServletResponse");
try {
ServletOutputStream os = response.getOutputStream();

// Set the Output Report File Name and Content Type
String contentDisposition = "attachment;filename=EmpReport.pdf";
response.setHeader("Content-Disposition",contentDisposition);
response.setContentType("application/pdf");

// Get the Data XML File as the XMLNode
XMLNode xmlNode = (XMLNode) am.invokeMethod("getEmpDataXML");
ByteArrayOutputStream outputStream = new ByteArrayOutputStream();
xmlNode.print(outputStream);
ByteArrayInputStream inputStream = new ByteArrayInputStream(outputStream.toByteArray());
ByteArrayOutputStream pdfFile = new ByteArrayOutputStream();

//Generate the PDF Report.
TemplateHelper.processTemplate(
((OADBTransactionImpl)pageContext.getApplicationModule(webBean).getOADBTransaction()).getAppsContext(),
APP_NAME,TEMPLATE_CODE,((OADBTransactionImpl)pageContext.getApplication
Module(webBean).getOADBTransaction()).getUserLocale().getLanguage(),((OADBTransactionImpl)
pageContext.getApplicationModule(webBean).getOADBTransaction()).getUserLocale().getCountry(),inputStream,
TemplateHelper.OUTPUT_TYPE_PDF,null,pdfFile);

// Write the PDF Report to the HttpServletResponse object and flush.
byte[] b = pdfFile.toByteArray();
response.setContentLength(b.length);
os.write(b, 0, b.length);
os.flush();
os.close();
}
catch(Exception e)
{
response.setContentType("text/html");
throw new OAException(e.getMessage(), OAException.ERROR);
}
pageContext.setDocumentRendered(false);
}
EMpAMImpl :

public void initEmpVO()
{ EmpVOImpl vo = getEmpVO1();
if(vo == null)
{ MessageToken errTokens[] = { new MessageToken("OBJECT_NAME", "EmpVO1") };
throw new OAException("AK", "FWK_TBX_OBJECT_NOT_FOUND", errTokens);
} else { vo.executeQuery(); }
}
public XMLNode getEmpDataXML()
{
OAViewObject vo = (OAViewObject)findViewObject("EmpVO1");
XMLNode xmlNode = (XMLNode) vo.writeXML(4, XMLInterface.XML_OPT_ALL_ROWS);
return xmlNode;
}
Run the EmpPG page and click on the tourch icon. The File Download window appear.
Click on the Open Button to view the report.
Upload Files into Server from local Machine
1. Create a New Workspace and Project
File > New > General > Workspace Configured for Oracle Applications
File Name – MahiFileUploadDemo
Automatically a new OA Project will also be created
Project Name -- FileUploadDemo
Default Package -- Mahi.oracle.apps.fnd.fileuploaddemo
2. Create a New Application Module (AM)
Right Click on FileUploadDemo > New > ADF Business Components > Application Module
Name -- FileUploadAM
Package -- Mahi.oracle.apps.fnd.fileuploaddemo.server
Check Application Module Class: FileUploadAMImpl Generate JavaFile(s)
3. Create a New Page
Right click on FileUploadDemo > New > Web Tier > OA Components > Page
Name -- FileUploadPG
Package -- Mahi.oracle.apps.fnd.fileuploaddemo.webui
4. Select the FileUploadPG and go to the strcuture pane where a default region has been created
5. Select region1 and set the following properties
| Attribute | Property |
| ID | PageLayoutRN |
| AM Definition | Mahi.oracle.apps.fnd.fileuploaddemo.server.FileUploadAM |
| Window Title | Uploading File into Server from Local Machine Demo Window |
| Title | Uploading File into Server from Local Machine Demo |
6. Create messageComponentLayout Region Under Page Layout Region
Right click PageLayoutRN > New > Region
| Attribute | Property |
| ID | MainRN |
| Item Style | messageComponentLayout |
7. Create a New Item messageFileUpload Bean under MainRN
Right click on MainRN > New > messageFileUpload
Set Following Properties for New Item --
| Attribute | Property |
| ID | MessageFileUpload |
| Item Style | MessageFileUpload |
8. Create a New Item Submit Button Bean under MainRN
Right click on MainRN > New > messageLayout
Set Following Properties for messageLayout --
| Attribute | Property |
| ID | ButtonLayout |
Right Click on ButtonLayout > New > Item
| Attribute | Property |
| ID | Submit |
| Item Style | submitButton |
| Attribute Set | /oracle/apps/fnd/attributesets/Buttons/Go |
9. Create Controller for page FileUploadPG
Right Click on PageLayoutRN > Set New Controller
Package Name: Mahi.oracle.apps.fnd.fileuploaddemo.webui
Class Name: FileUploadCO
Write Following Code in FileUploadCO processFormRequest
import oracle.cabo.ui.data.DataObject;
import java.io.FileOutputStream;
import java.io.InputStream;
import oracle.jbo.domain.BlobDomain;
import java.io.File;
import oracle.apps.fnd.framework.OAException;
public void processFormRequest(OAPageContext pageContext, OAWebBean webBean)
{ super.processFormRequest(pageContext, webBean);
 if(pageContext.getParameter("Submit")!=null)
 {
  upLoadFile(pageContext,webBean);
 }
}
CODE #1 -- If Page has not deployed at instance, testing at Local Machine, use following Code
public void upLoadFile(OAPageContext pageContext,OAWebBean webBean)
{ String filePath = "D:\\Mahi";
 System.out.println("Default File Path---->"+filePath);
 String fileUrl = null;
 try
 {
  DataObject fileUploadData =  pageContext.getNamedDataObject("MessageFileUpload");
//FileUploading is my MessageFileUpload Bean Id
  if(fileUploadData!=null)
  {
   String uFileName = (String)fileUploadData.selectValue(null, "UPLOAD_FILE_NAME");
   String contentType = (String) fileUploadData.selectValue(null, "UPLOAD_FILE_MIME_TYPE");
   System.out.println("User File Name---->"+uFileName);
   FileOutputStream output = null;
   InputStream input = null;
   BlobDomain uploadedByteStream = (BlobDomain)fileUploadData.selectValue(null, uFileName);
   System.out.println("uploadedByteStream---->"+uploadedByteStream);

   File file = new File("D:\\Mahi", uFileName);
   System.out.println("File output---->"+file);
   output = new FileOutputStream(file);
   System.out.println("output----->"+output);
   input = uploadedByteStream.getInputStream();
   System.out.println("input---->"+input);
   byte abyte0[] = new byte[0x19000];
   int i;

   while((i = input.read(abyte0)) > 0)
   output.write(abyte0, 0, i);
   output.close();
   input.close();
  }
 }
 catch(Exception ex)
 {
  throw new OAException(ex.getMessage(), OAException.ERROR);
 }
}
CODE #2 --If Page has been Deployed at Instance, Use Following Code
public void upLoadFile(OAPageContext pageContext,OAWebBean webBean)
{ String filePath = "/u01/app/apnac03r12/Mahi/";
 System.out.println("Default File Path---->"+filePath);
 String fileUrl = null;
 try
 {
  DataObject fileUploadData =  pageContext.getNamedDataObject("MessageFileUpload");
//FileUploading is my MessageFileUpload Bean Id
  if(fileUploadData!=null)
  {
   String uFileName = (String)fileUploadData.selectValue(null, "UPLOAD_FILE_NAME");
   String contentType = (String) fileUploadData.selectValue(null, "UPLOAD_FILE_MIME_TYPE");
   System.out.println("User File Name---->"+uFileName);
   FileOutputStream output = null;
   InputStream input = null;
   BlobDomain uploadedByteStream = (BlobDomain)fileUploadData.selectValue(null, uFileName);
   System.out.println("uploadedByteStream---->"+uploadedByteStream);

   File file = new File("/u01/app/apnac03r12/Mahi", uFileName);
   System.out.println("File output---->"+file);
   output = new FileOutputStream(file);
   System.out.println("output----->"+output);
   input = uploadedByteStream.getInputStream();
   System.out.println("input---->"+input);
   byte abyte0[] = new byte[0x19000];
   int i;

   while((i = input.read(abyte0)) > 0)
   output.write(abyte0, 0, i);
   output.close();
   input.close();
  }
 }
 catch(Exception ex)
 {
  throw new OAException(ex.getMessage(), OAException.ERROR);
 }
}
USAGE OF JDR_UTILS API
DECLARE
BEGIN
jdr_utils.listdocuments('/oracle/apps/ap/oie',TRUE);
END;
DECLARE
BEGIN
jdr_utils.listcustomizations(p_document => '/oracle/apps/ap/oie/test/webui/HomePG');
END;
DECLARE
BEGIN
jdr_utils.printdocument(p_document =>
'/oracle/apps/ap/oie/test/webui/customizations/site/0/HomePG');
END;
DECLARE
BEGIN
jdr_utils.printdocument(p_document =>
'/oracle/apps/ap/oie/test/webui/customizations/site/0/HomePG');
END;
Add Responsibility To Oracle FND User
API - fnd_user_pkg.addresp

Example --

-- ----------------------------------------------------------

-- Add Responsibility to Oracle FND User

-- -----------------------------------------------------------

DECLARE

    lc_user_name                           VARCHAR2(100)     := 'MAHI';

    lc_resp_appl_short_name    VARCHAR2(100)     := 'FND';

    lc_responsibility_key            VARCHAR2(100)     := 'APPLICATION_DEVELOPER';

    lc_security_group_key          VARCHAR2(100)     := 'STANDARD';

    ld_resp_start_date                  DATE                          := TO_DATE('25-JUN-2012');

    ld_resp_end_date                   DATE                           := NULL;

BEGIN
     fnd_user_pkg.addresp
     (   username           => lc_user_name,
        resp_app             => lc_resp_appl_short_name,
        resp_key             => lc_responsibility_key,
        security_group  => lc_security_group_key,
        description         => NULL,
        start_date           => ld_resp_start_date,
        end_date            => ld_resp_end_date
    );
 COMMIT;
EXCEPTION
            WHEN OTHERS THEN
                        ROLLBACK;
                        DBMS_OUTPUT.PUT_LINE(SQLERRM);
END;
/
SHOW ERR;
Calling Concurrent Program in OAF
public int submitRequest( String ProgramApplication ,String ProgramName ,String ProgramDescription ,String StartTime,boolean SubRequest,Vector Parameters ) throws RequestSubmissionException
ProgramApplication -Application Short name of application under which the program is registered.
ProgramName - Concurrent Program Name for which the request has to be submitted.
ProgramDescription - Concurrent Program Description.
StartTime - Time at which the request should start running.
SubRequest - Set to TRUE if the request is submitted from another running request and has to be treated as a sub request.
Parameters - Parameters of the concurrent Request.
Example:
public int submitCPRequest(OAPageContext oapagecontext,OAWebBean oawebbean,Number headerId)
{
OAApplicationModule am = oapagecontext.getApplicationModule(oawebbean);
try {
OADBTransaction tx = (OADBTransaction)am.getOADBTransaction();
java.sql.Connection pConncection = tx.getJdbcConnection();
ConcurrentRequest cr = new ConcurrentRequest(pConncection);
String applnName = "PO"; //Application that contains the concurrent program
String cpName = "POXXXX"; //Concurrent program name
String cpDesc = "Concurrent Program Description"; // concurrent Program description
Vector cpArgs = new Vector(); // Pass the Arguments using vector
cpArgs.addElement((String)headerId);
int requestId = cr.submitRequest(applnName, cpName, cpDesc, null, false, cpArgs); // Calling the Concurrent Program
tx.commit();
return requestId;
}
catch (RequestSubmissionException e)
{
OAException oe = new OAException(e.getMessage());
oe.setApplicationModule(am);
throw oe;
}
}
MVC Architecture in OAF
The MVC architecture is a component-based design pattern with clean interfaces between the Model, View, and Controller.
The MVC architecture, being the industry standard for networked applications is employed in the Oracle Applications Framework and various
components of the OA framework help implement the features of MVC.
Model
The Model is where the application implements its business logic. All the BC4J components in OAF comes under Model like AM (Application Module),
VO (View Object), EO (Entity Object), VL (View Link) & AO (Association Object).
The Model in the OA framework is known as the Application Module or the AM. It is implemented using the Oracle Business Components for Java (BC4J) which is optimized ready-to-use implementation of J2EE design patterns. These BC4Js actually help the developers to concentrate on writing code for business logic rather than code for the connecting glues and pipes.
The BC4J application model (AM) is basically a container that manages and provides access to related model objects i.e. the ones that participate in same end-to-end transactions. Each OA Framework page has a root AM that is associated with the top level region of the page known as the Page Layout region.
The other basic functions of the AM are:-
Providing context to the transactions. This context is known as the Page Context.
Establishing Database Connections.
View
The View is where the application implements its user interface. View means the UI (User Interface) that is visible to the Users.
The View in the OA Framework is implemented using the User Interface XML or UIX. UIX uses XML to describe the components and hierarchy that make
up an application page. The metadata used to describe the UI is loaded into a database repository, called Meta Data Services (MDS), at
deployment time and optionally at design time as well. UIX also provides runtime capabilities to translate this metadata into HTML output so that
it can be shown on a Browser or a mobile device. Various features that can be implemented using OA Framework UI are:-
PPR – Partial Page Rendering for displaying only the requisite parts of a page at a time.
Hot Keys – Numeric keys for easy access to specific fields on a form
LOV Auto Completion – Also known as List Of Value Completion that helps search a value to enter from a long list of values
Smart Poplist – Query based independent drop down lists.
Control
The Controller is where the application handles user interaction and directs business flow. Controller is a simple java class file that contains
methods for initial page request and post back request.
The Control in the OA Framework is known as the Controller Object or CO and has a normal java class based
implementation. Its major functions are:-
- Handling user-driven interactions.
- Handling application-driven interactions.
- Implementing two step transactions i.e. two step page flows.
- Instantiating the Model objects.
- Invoking appropriate Model object methods.
- Displaying context based UI messages.
Calling Workflow from OAF
From OAF Workflow can be called in 2 ways.
1)Using PL SQL Procedure, call procedure from OAF page using callable statement.
CREATE OR REPLACE PROCEDURE start_sw_wf_prc
IS
l_itemtype VARCHAR2 (30) := 'XX_TEST_SW';
l_itemkey VARCHAR2 (300) := 'Practice-1';
BEGIN
wf_engine.createprocess (l_itemtype, l_itemkey, 'XX_MAIN_PROCESS_SW');
wf_engine.setitemowner (itemtype => l_itemtype,itemkey => l_itemkey,owner => 'MOKSHITH');
wf_engine.startprocess (l_itemtype, l_itemkey);
COMMIT; END;
2) Write following function in Controller of the OAF page.
public void callCustomWorkFlow(OAPageContext pageContext)
{
String strWfItemType = "XX_TEST_SW"; String strWfProcess = "XX_MAIN_PROCESS_SW";
String strWfItemKey = "Practice-1";
OANavigation wfNavigation = new OANavigation(); // Create Workflow Process
wfNavigation.createProcess(pageContext, strWfItemType, strWfProcess, strWfItemKey);
wfNavigation.setItemOwner(pageContext," MOKSHITH"); // Start Workflow Process
wfNavigation.startProcess(pageContext, strWfItemType, strWfProcess, strWfItemKey);
}